Lab 4: oAuth and AzureAD Lab
The purpose of this lab is to familiarize the Student with the using APM
in conjunction with Microsoft Azure AD. Microsoft Active Directory
Domain Services is offered by Microsoft Azure as a cloud service. This
can be used together with OpenID to log in to APM.
Objective:
Gain an understanding of additional F5 OAuth features
Deploy a working configuration using F5 APM and Microsoft Azure AD
Lab Requirements:
All lab requirements will be noted in the tasks that follow
Estimated completion time: 25 minutes
Lab 4 Tasks:
TASK 1: Create/Review New Application Registration
Refer to the instructions and screen shots below:
Note: The following steps in this task can just be “REVIEWED”. As setting up a free Azure
account requires the entry of billing information, setting up an account and performing the
steps below is a [REVIEW] task. For those desiring to set up an account refer to the
“APPENDIX: Setting up an Azure Development Account”. For those with existing accounts
these steps may be followed if desired. For all others, simply review the steps in
Task1 and proceed to Task 2.
[REVIEW]
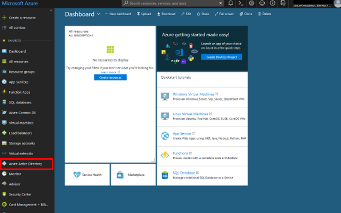
Log into the Microsoft Azure Dashboard and click Azure Active Directory in the left
navigation menu.
[REVIEW]
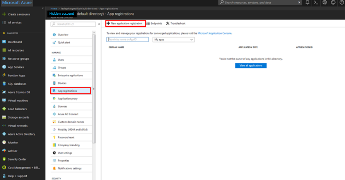
Click on App Registration on the resulting menu and then
New Application Registration on the flyout menu.
[REVIEW]
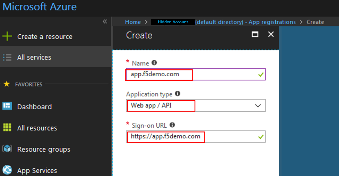
In the pop menu for Create App Registration , enter the following values
Name: app.f5demo.com Application Type: Web App /API Sign On URL: https://app.f5demo.com
Click Create .
[REVIEW]
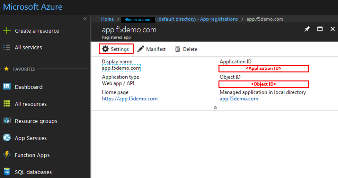
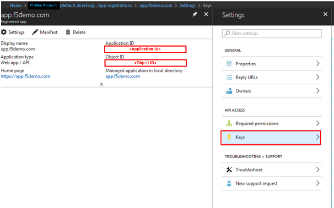
In the resulting app.f5demo.com Registered App window, note & copy the
Application ID . This will be used in a later setup step
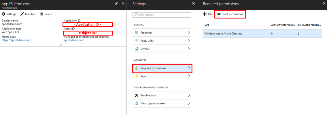
Click Settings .
[REVIEW]
In the Settings flyout panel, click Keys
[REVIEW]
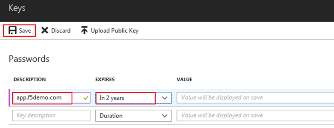
In the Keys flyout panel, enter the following values
Description: app.f5demo.com Expires: In 2 Years
Click Save .
[REVIEW]
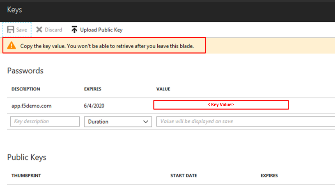
Note the message provided by Azure in the Keys panel.
Copy the *Key Value* for use in a later setup step.
[REVIEW]
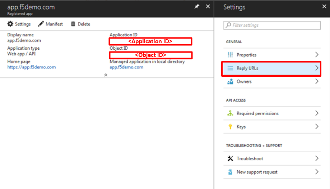
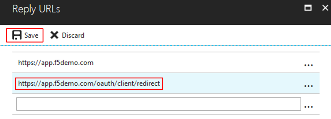
In the Settings flyout panel, click Reply URL .
[REVIEW]
In the Reply URL flyout panel, enter
https://app.f5demo.com/oauth/client/redirect
Click Save .
[REVIEW]
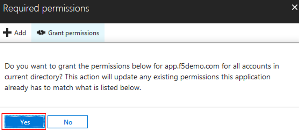
In the Settings flyout panel, click Required Permissions
In the Required Permissions flyout panel, click Grant Permissions
[REVIEW]
The following Required Permissions dialogue box may appear.
Click Yes to proceed.
[REVIEW]
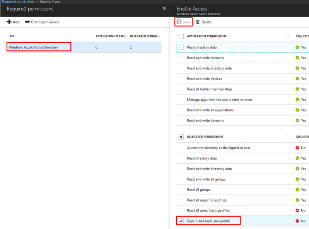
In the Required Permissions flyout panel, click Windows Azure Active Directory .
In the Enable Access flyout panel, ensure the Sign In and Read User Profile .
permission is checked.
Click Save .
[REVIEW]
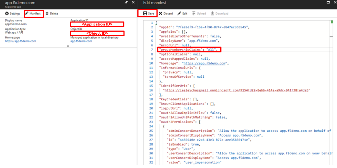
In the Registered Application panel, click Manifest .
In the Edit Manifest flyout panel, edit the groupMembershipClaims line (line 7)
from null to “All” (note quotes are required).
Click Save .
Note: You can also update groupMembershipClaims to be “SecurityGroup”.
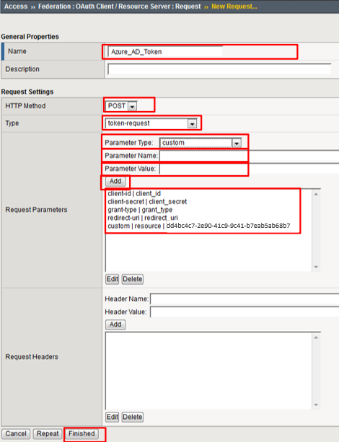
TASK 2: Create OAuth Request
Refer to the instructions and screen shots below:
Create the OAuth Request by navigating to Access -> Federation ->
OAuth Client/Resource Server -> Request and clicking Create
Use the following values to create the Request
Name: Azure_AD_Token HTTP Method: POST Type: token-request
Create the following Request Parameters using the Parameter Type drop down:
Parameter Type: client-id Parameter Name: client_id (notice _ )Parameter Type: client-secret Parameter Name: client_secret (notice _ )Parameter Type: grant-type Parameter Name: grant_type (notice _ )Parameter Type: redirect-uri Parameter Name: redirect_uri (notice _ )Parameter Type: custom Parameter Name: resource Parameter Value: dd4bc4c7-2e90-41c9-9c41-b7eab5ab68b7
Click Finished .
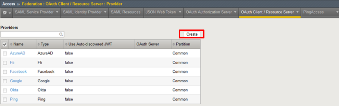
TASK 3: Create OAuth Provider
Refer to the instructions and screen shots below:
Create the OAuth Provider by navigating to Access -> Federation ->
OAuth Client/Resource Server -> Provider and clicking Create .
Use the following values to create the Request
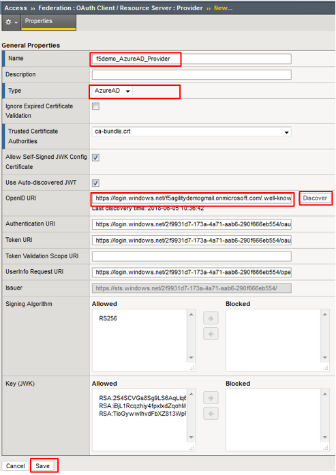
Name : f5demo_AzureAD_Provider
Type : AzureAD
OpenID URI: (replace _tennantID_ with the following tenantID
f5agilitydemogmail.onmicrosoft.com )
Resulting URI should be as follows:
https://login.windows.net/f5agilitydemogmail.onmicrosoft.com/.well-known/openid-configuration
Click Discover .
Click Save .
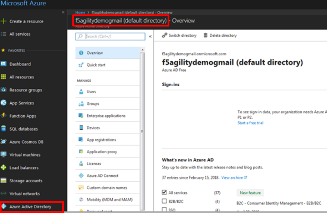
Note: if using another account you can find you TenantID by navigating to the
“Azure Portal” and clicking “Azure Active Directory”. The tenant ID is the
“default directory” as shown. The full name of the TenantID will be your
“TenantID.onmicrosoft.com”
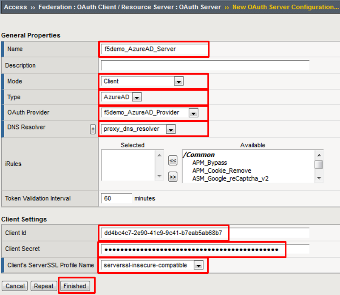
TASK 4: Create OAuth Server
Refer to the instructions and screen shots below:
Create the OAuth Server (Client) by navigating to Access -> Federation ->
OAuth Client/Resource Server -> OAuth Server* and clicking Create .
Using the following values to complete the OAuth Provider
Name: f5demo_AzureAD_Server Mode: Client Type: AzureAD OAuth Provider: f5demo_AzureAD_Provider DNS Resolver: proxy_dns_resolver Client ID: dd4bc4c7-2e90-41c9-9c41-b7eab5ab68b7 Client Secret: YqHbzTosdBxdaGl9A/hXCs1ex1HWi+BTUSkgcfhbTwA= Client’s Server SSL Profile Name: serverssl-insecure-compatible
Click Finished .
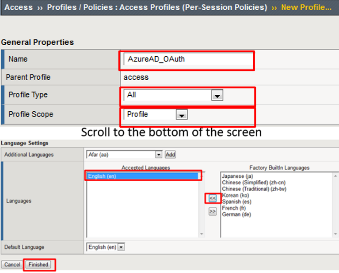
TASK 5: Setup F5 Per Session Policy (Access Policy)
Refer to the instructions and screen shots below:
Create the Per Session Policy by navigating to Access -> Profile/Policies ->
Access Profiles (Per Session Policies) and clicking Create .
In the New Profile dialogue window enter the following values
Name: AzureAD_OAuth Profile Type: All Profile Scope: Profile Language: English
Click Finished .
Click Edit link on for the AzureAD_OAuth Access Policy
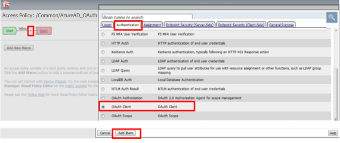
In the AzureAD_OAuth Access Policy, click the “+ ” between Start & Deny
Click the Authentication tab in the events window.
Scroll down and click the radio button for OAuth Client .
Click Add Item .
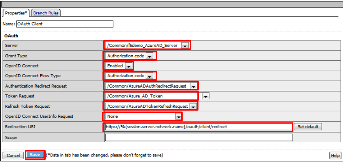
In the *OAuth_Client* window enter the following values as shown:
Server: /Common/f5demo_AzureAD_Server Grant Type: Authorization code OpenID Connect: Enabled OpenID Connect Flow Type: Authorization code Authentication Redirect Request: /Common/AzureADAuthRedirectRequest Token Request: /Common/Azure_AD_Token Refresh Token Request: /Common/AzureADTokenRefreshRequest OpenID Connect UserInfo Request: None Redirection URI: https://%{session.server.network.name}/oauth/client/redirect
Click Save .
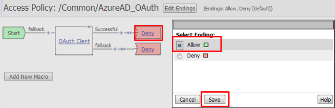
Click on the Deny link, in the Select Binding , select the Allow radio button
and click Save .
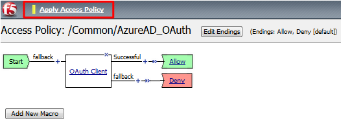
Click on the Apply Access Policy link in the top left-hand corner.
Note: Additional actions can be taken in the Per Session policy (Access Policy). The lab
is simply completing authorization. Other access controls can be implemented based
on the use case.
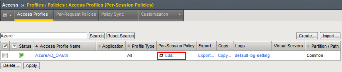
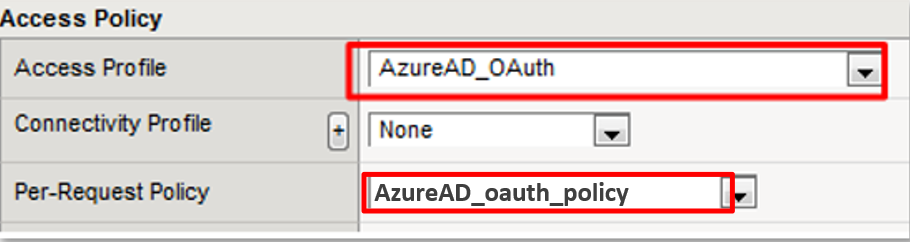
TASK 6: Associate Access Policy to Virtual Server
Refer to the instructions and screen shots below:
Navigate to Local Traffic -> Virtual Servers -> Virtual Server List and
click on the app.f5demo.com Virtual Server link
Scroll to the Access Policy section.
Use the Access Profile drop down to change the Access Profile to
AzureAD_OAuth .
Use the Per-Request Policy drop down to change the Per-Request Policy to
AzureAD_oauth_policy .
Scroll to the bottom of the Virtual Server configuration and click Update .
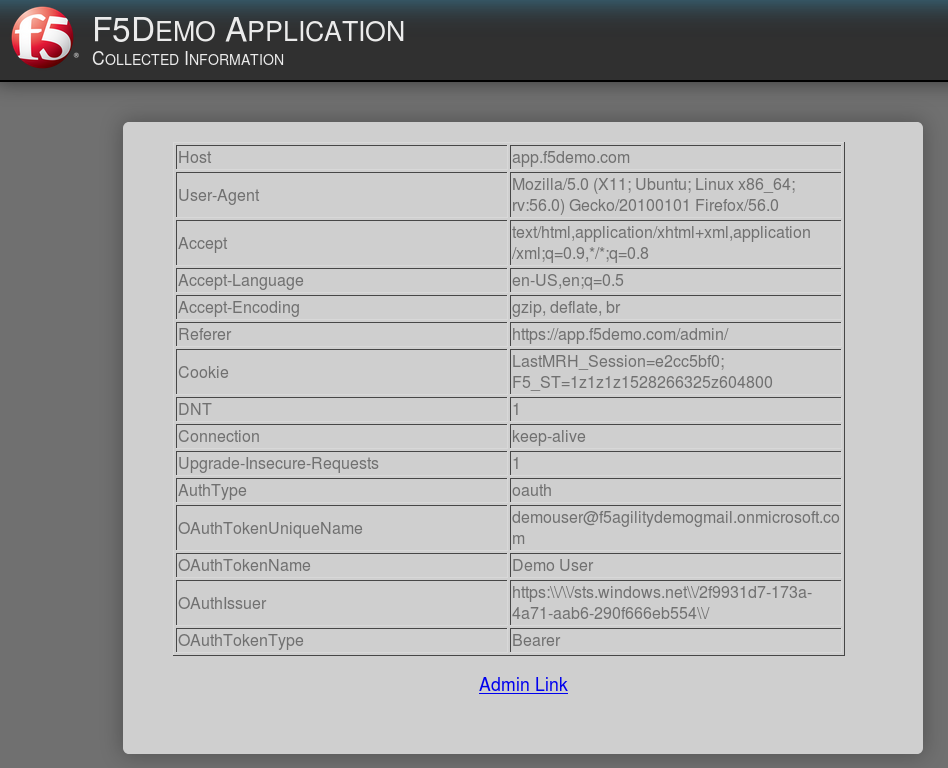
TASK 8: Per Request Policy Controls
Refer to the instructions and screen shots below:
As in the prior lab, you can experiment with Per Request Policy controls. In the
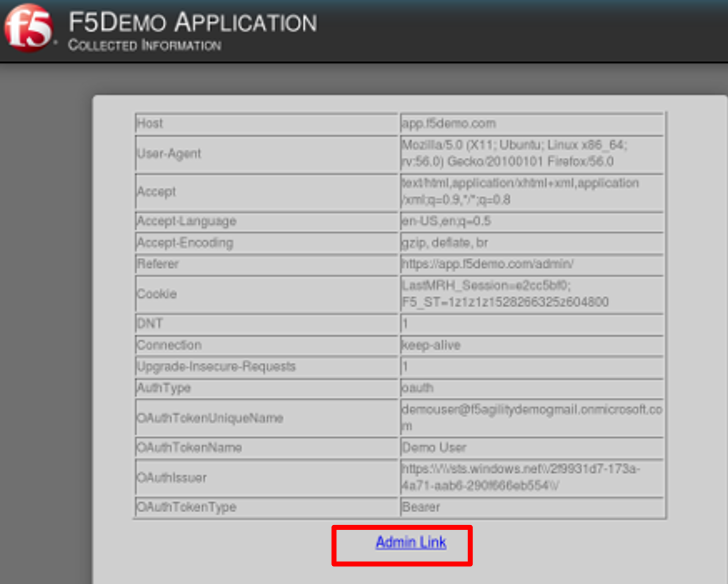
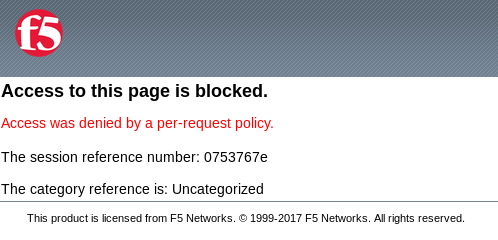
application page for https://app.f5demo.com click the Admin Link shown.
You will receive an Access to this page is blocked (customizable) message with a
reference. You have been blocked because you do not have access on a per request basis.
Press the Back button in your browser to return to https://app.f5demo.com .
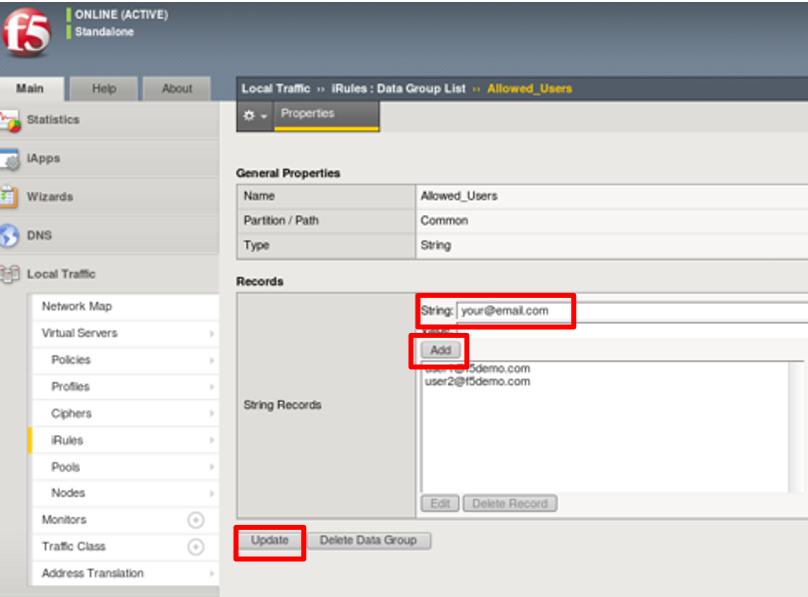
Navigate to Local Traffic -> iRules -> Datagroup List and click on the
Allowed_Users datagroup.
Enter your demouser@f5agilitydemogmail.onmicrosoft.com used for this lab as the
String value.
Click Add then Click Update .
Note: We are using a DataGroup control to minimize lab resources and steps. AD or LDAP
Group memberships, Session variables, other user attributes and various other access
control mechanisms can be used to achieve similar results.
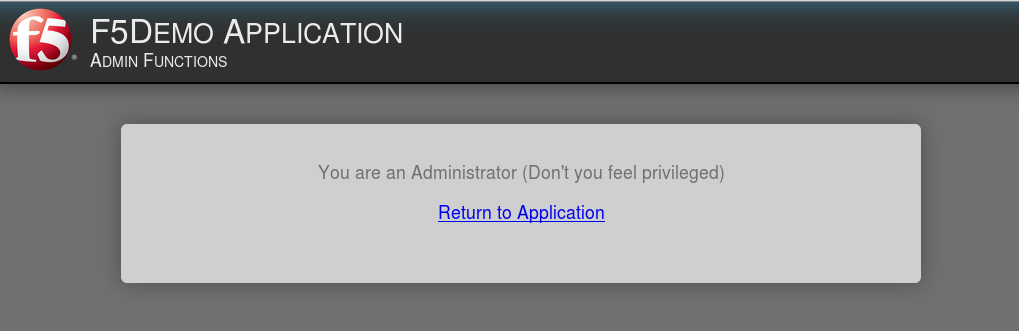
You should now be able to successfully to access the Admin Functions by clicking on the
Admin Link.
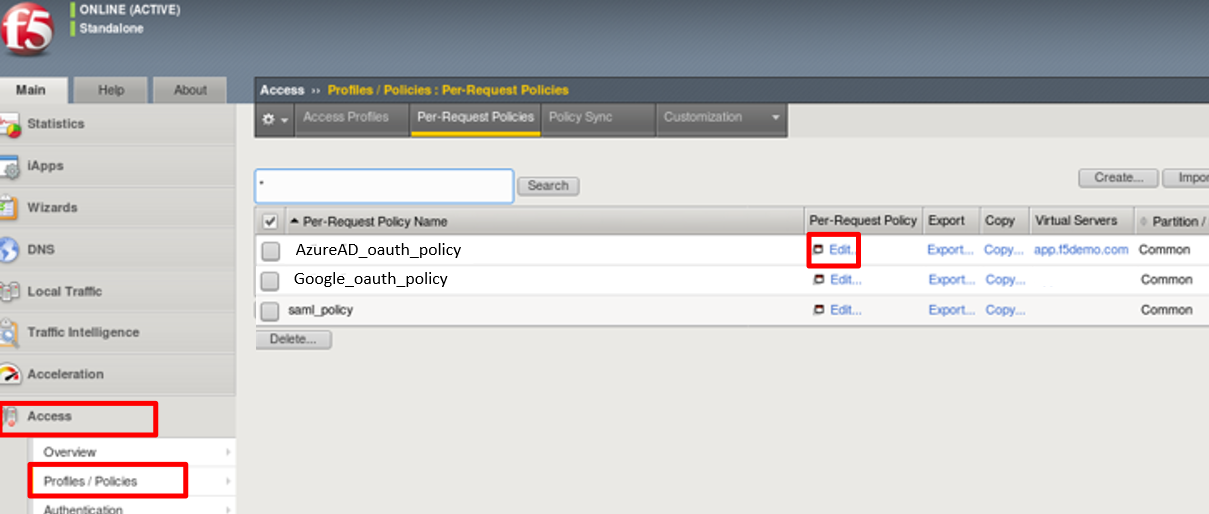
Note: Per Request Policies are dynamic and do not require the same “Apply Policy” action
as Per Session Policies .
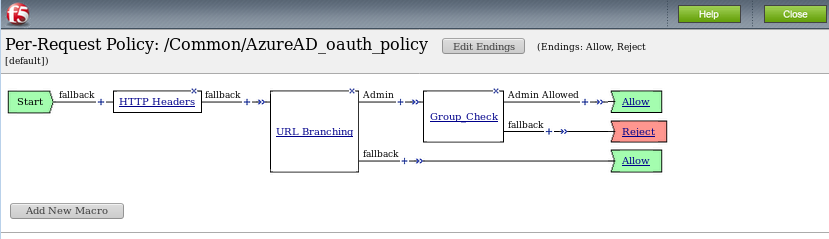
To review the Per Request Policy, navigate to *Access -> Profiles/Policies ->
Per Request Policies and click on the Edit link for the AzureAD_oauth_policy .
The various Per-Request-Policy actions can be reviewed.
Note: Other actions like Step-Up Auth controls can be performed in a Per-Request Policy
TASK 9: Review OAuth Results
Refer to the instructions and screen shots below:
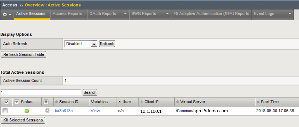
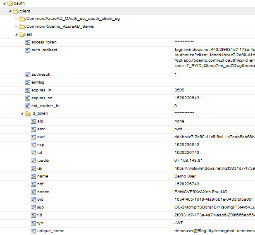
Review your Active Sessions (Access -> Overview -> Active Sessions ).
You can review Session activity or session variable from this window or kill the
selected Session.
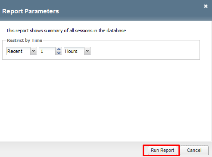
Review your Access Report Logs (Access -> Overview -> Access Reports ).
In the Report Parameters window click Run Report .
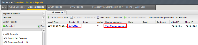
Look at the SessionID report by clicking the Session ID Link.
Look at the Session Variables report by clicking the View Session Variables link.
Pay attention to the OAuth Variables.
Note: Any of these session variables can be used to perform further actions to improve
security or constrain access with logic in the Per-Session or Per Request VPE policies
or iRules/iRulesLX.
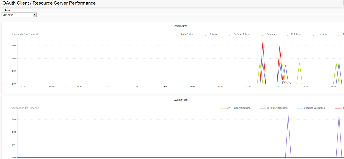
Review your Access Report Logs (Access -> Overview -> OAuth Reports ->
Client/Resource Server ).