Lab 2: IDaaS SAML Identity Provider (iDP) Lab (OKTA)
The purpose of this lab is to configure and test a IDaaS SAML Identity
Provider. Students will configure a IDaaS based SAML Identity Provider
(in this case OKTA) and import and bind to a SAML Service Provider and
test IdP-Initiated and SP-Initiated SAML Federation.
Objective:
Gain an understanding of integrating a IDaaS SAML Identity
Provider(IdP)
Gain an understanding of the access flow for IdP-Initiated SAML
Lab Requirements:
All Lab requirements will be noted in the tasks that follow
Estimated completion time: 25 minutes
Lab 2 Tasks:
TASK 1: Sign Up for OKTA Developer Account
Refer to the instructions and screen shots below:
Note: The following steps provide instruction for setting up an OKTA developer account.
If you already have one, you may elect to use that account. Understand, however, that the
instructions below may need to be modified to match your environment.
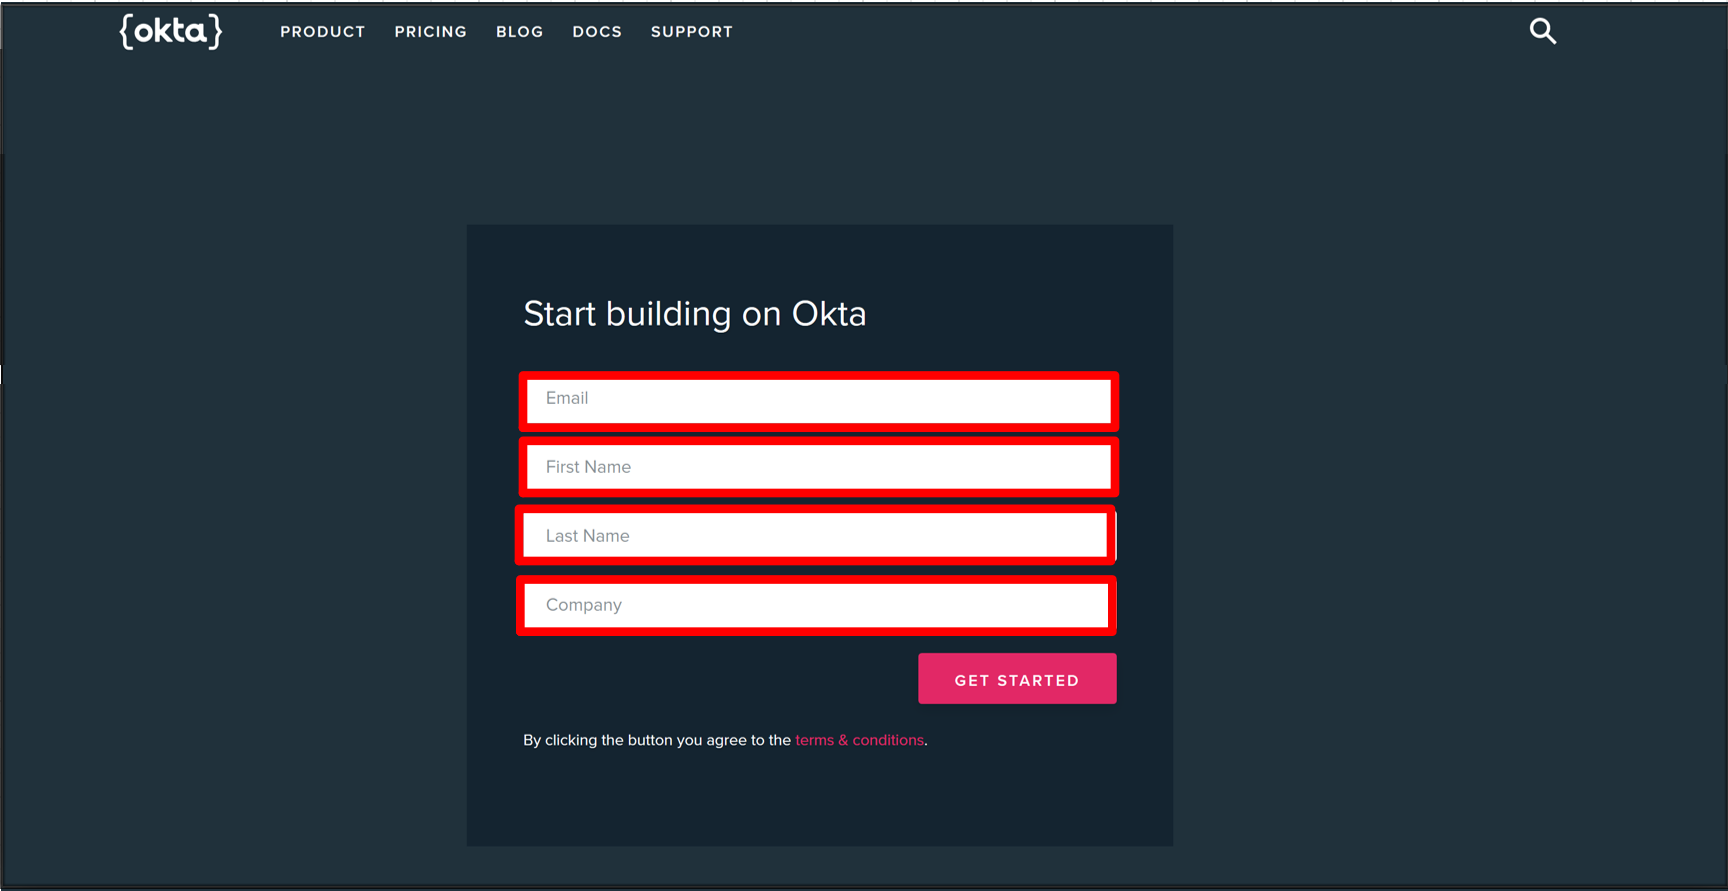
Sign Up for an OKTA developer account by navigating to:
https://developer.okta.com/signup/ and using a VALID email and click Get Started
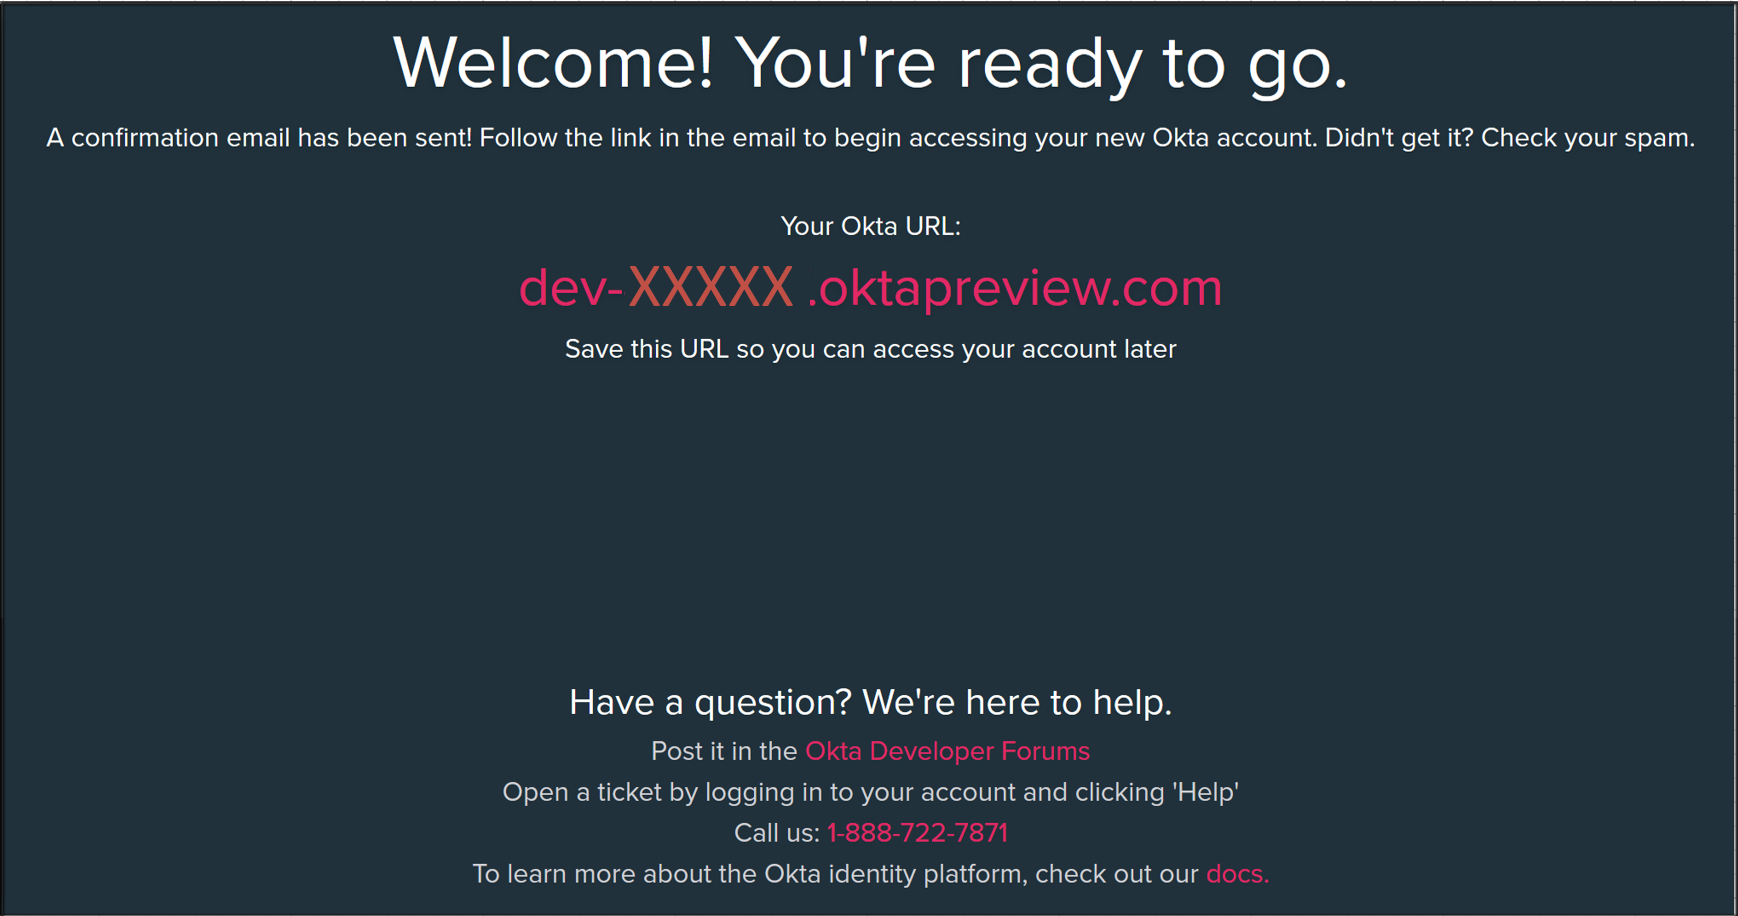
Upon registration, you will be directed to a hyperlink (hostname) for your developer
account. This link should be saved for future use.
Additional instructions will be sent to the email address provided during account setup.
Following the instructions received from the generated email, sign into the OKTA
development environment with your provided, temporary password.
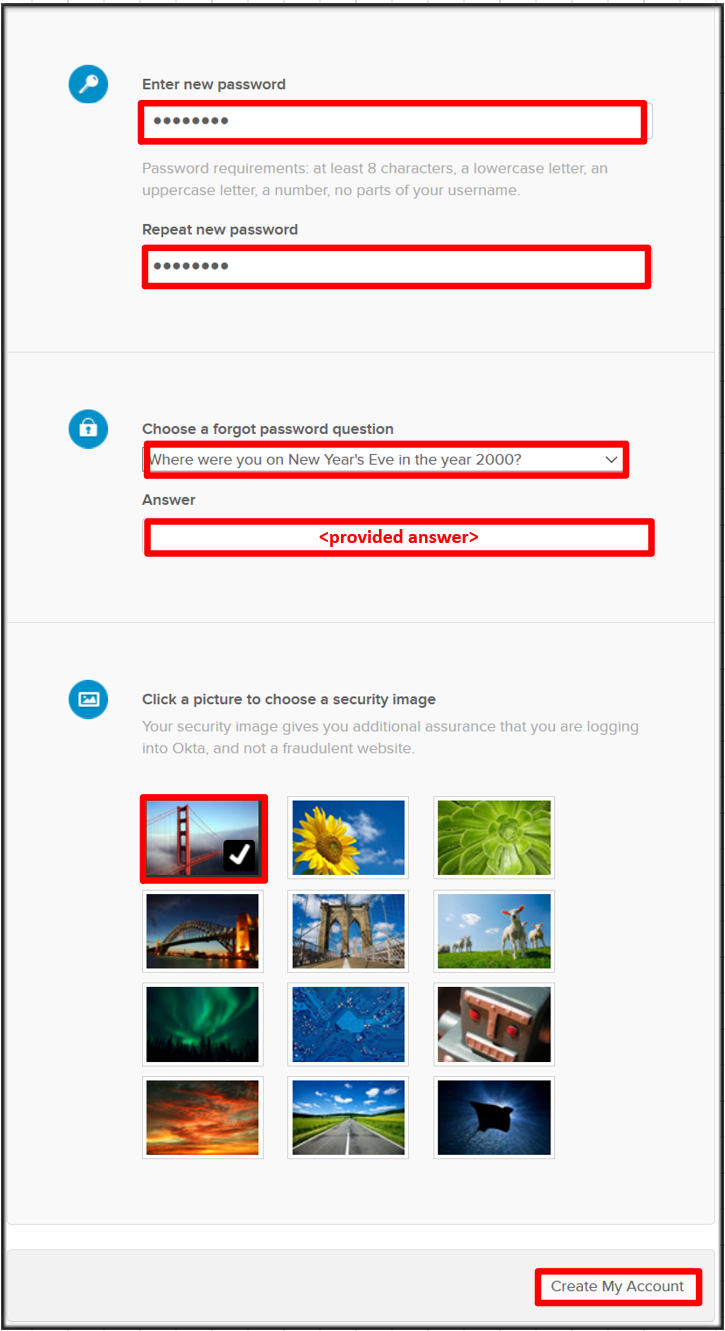
Enter a New Password and the Repeat New Password
Use the drop down to select a Forgot Password Question and provide the Answer
Click a Security Image
Click Create My Account
TASK 2: OKTA Classic UI
Refer to the instructions and screen shots below:
For the purposes of the lab and SAML development, we will be using the OKTA Classic UI
which provides access to SAML configurations. (Note: At lab publication, the Developer
Console did not have SAML resources.)
In the top, left hand corner click the <> & select Classic UI from the drop down.
TASK 3: Enable OKTA Multi-Factor Authentication [OPTIONAL]
Refer to the instructions and screen shots below. This task will require a mobile app to enable a second factor.
[OPTIONAL]
Note: Enabling MFA will require a Smart Device with the appropriate OKTA client for your OS
The step can be skipped if you prefer to just use UserID/Password
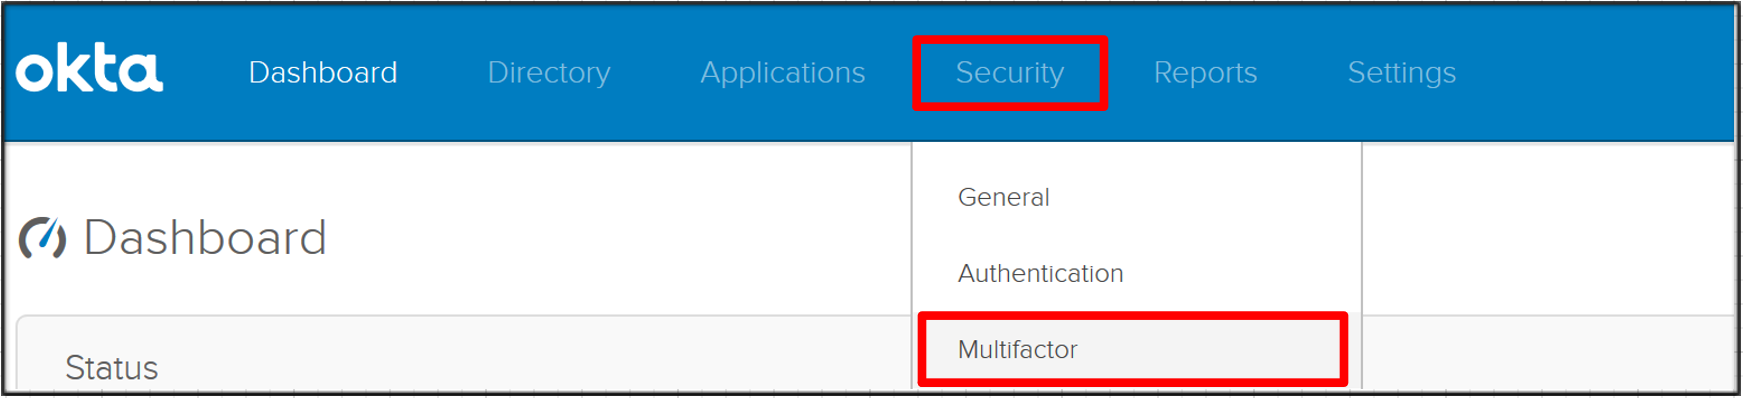
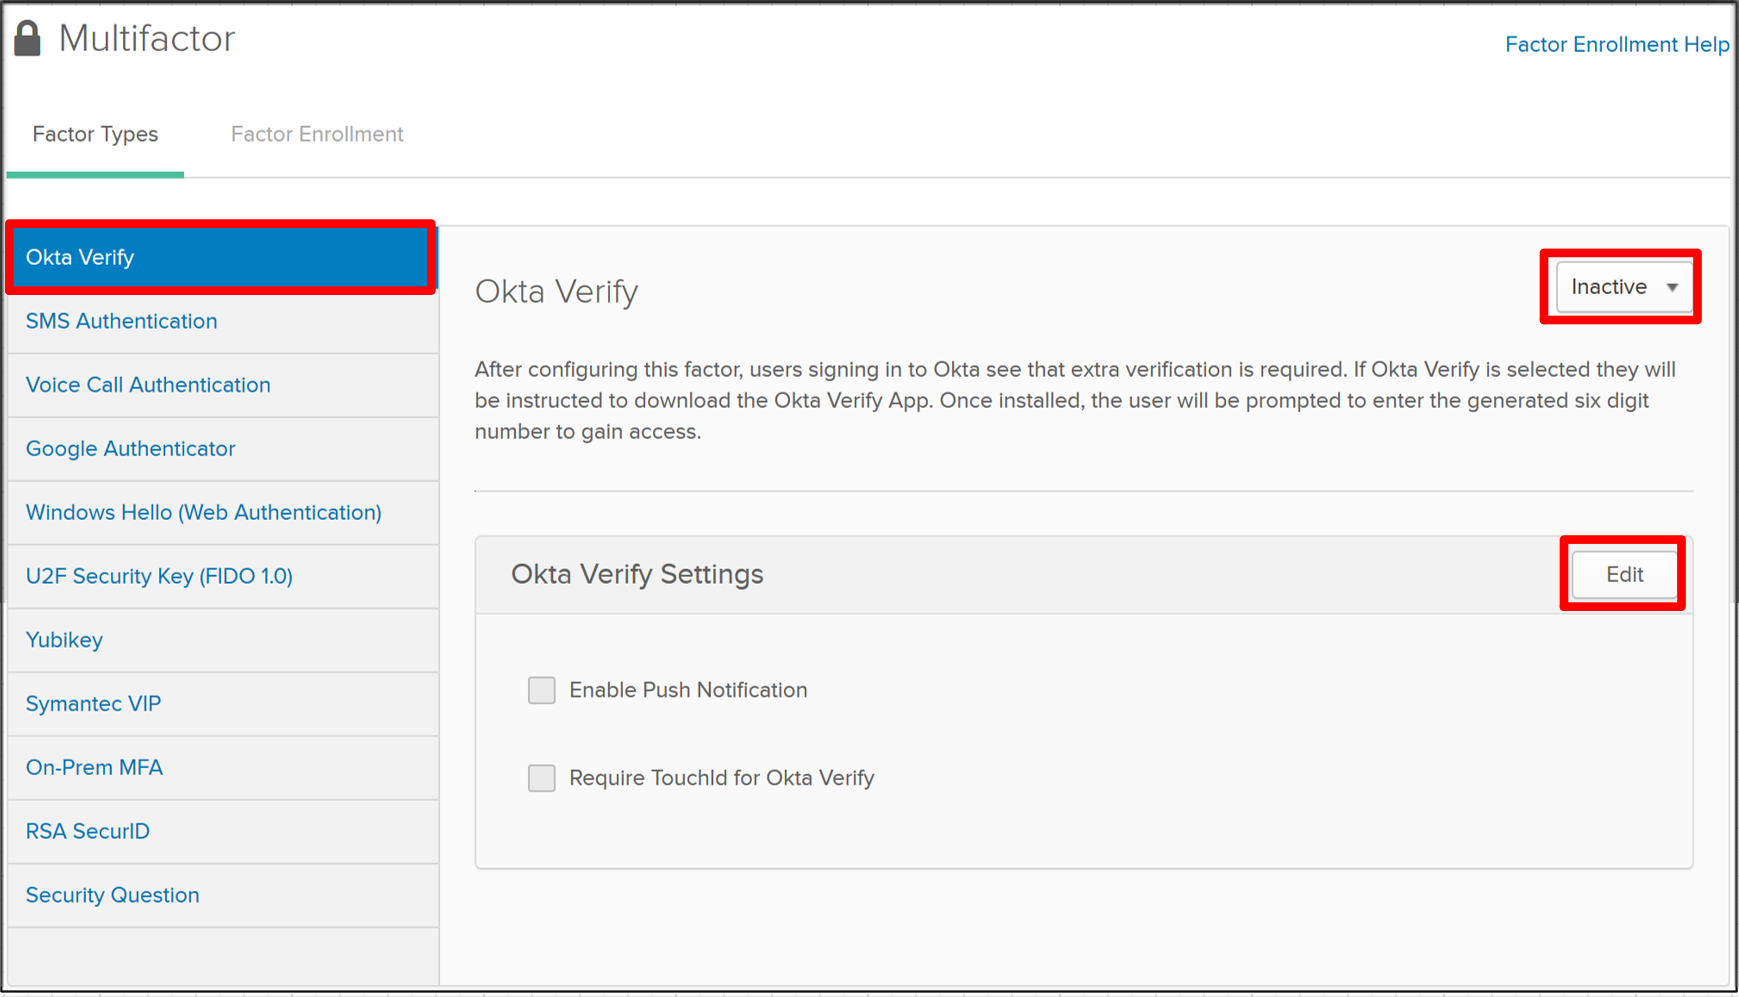
Click Security from the top navigation, then click Multifactor
[OPTIONAL]
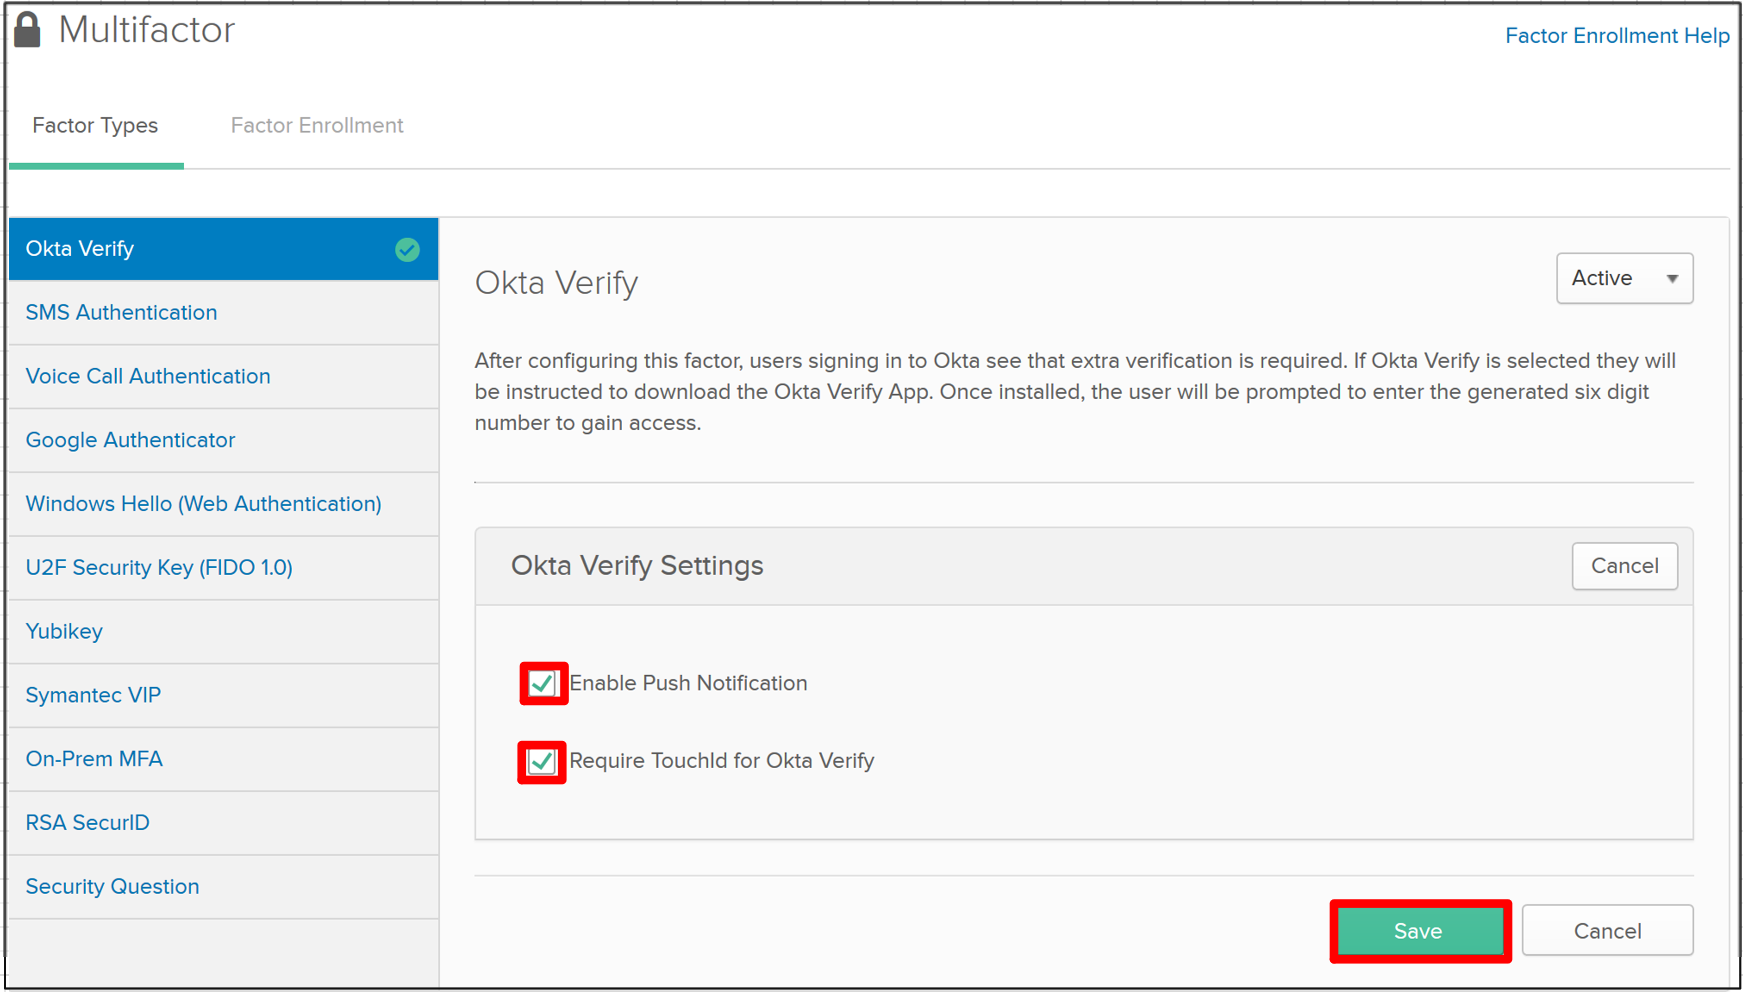
Under OKTA Verify , change the dropdown from Inactive to Active
Click the Edit button next to *OKTA Verify Settings
[OPTIONAL]
Check Enable Push Verification
Check Require TouchID for OKTA Verify (optional)
Click Save
TASK 4: Build SAML Application - OKTA
Refer to the instructions and screen shots below:
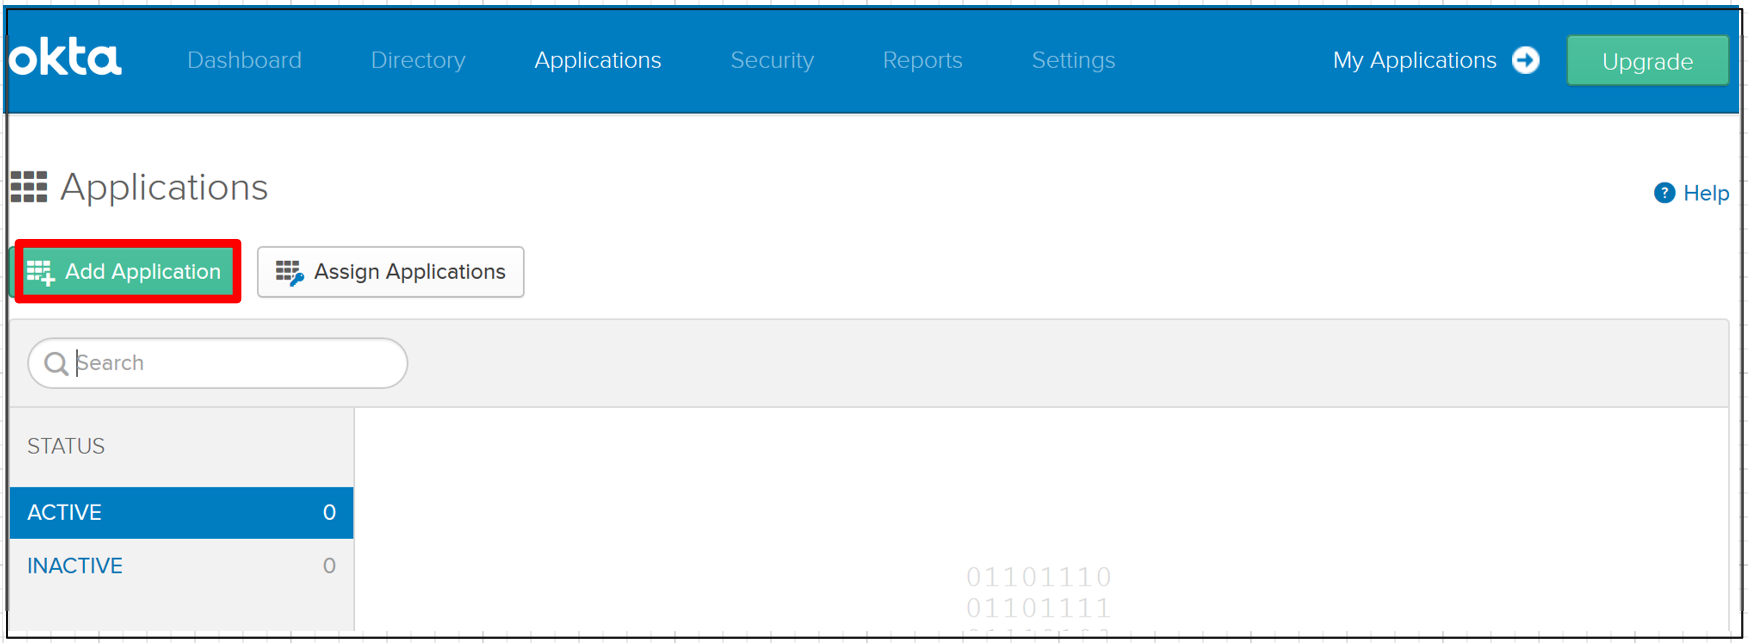
In the main menu, click Applications , and Applications from the dropdown in the
top navigation.
Click Add Application in the Applications dialogue window.
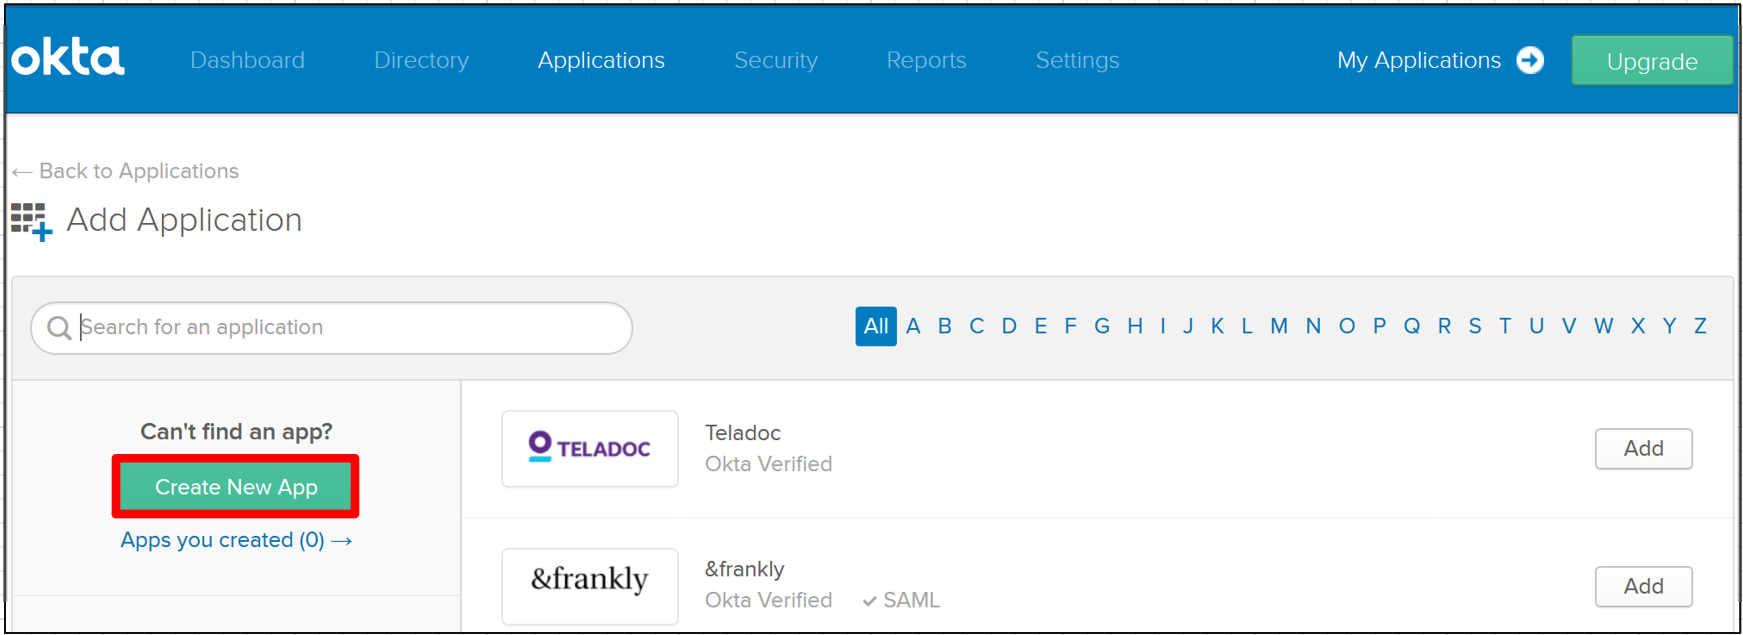
Click Create New App in the Add Application Menu
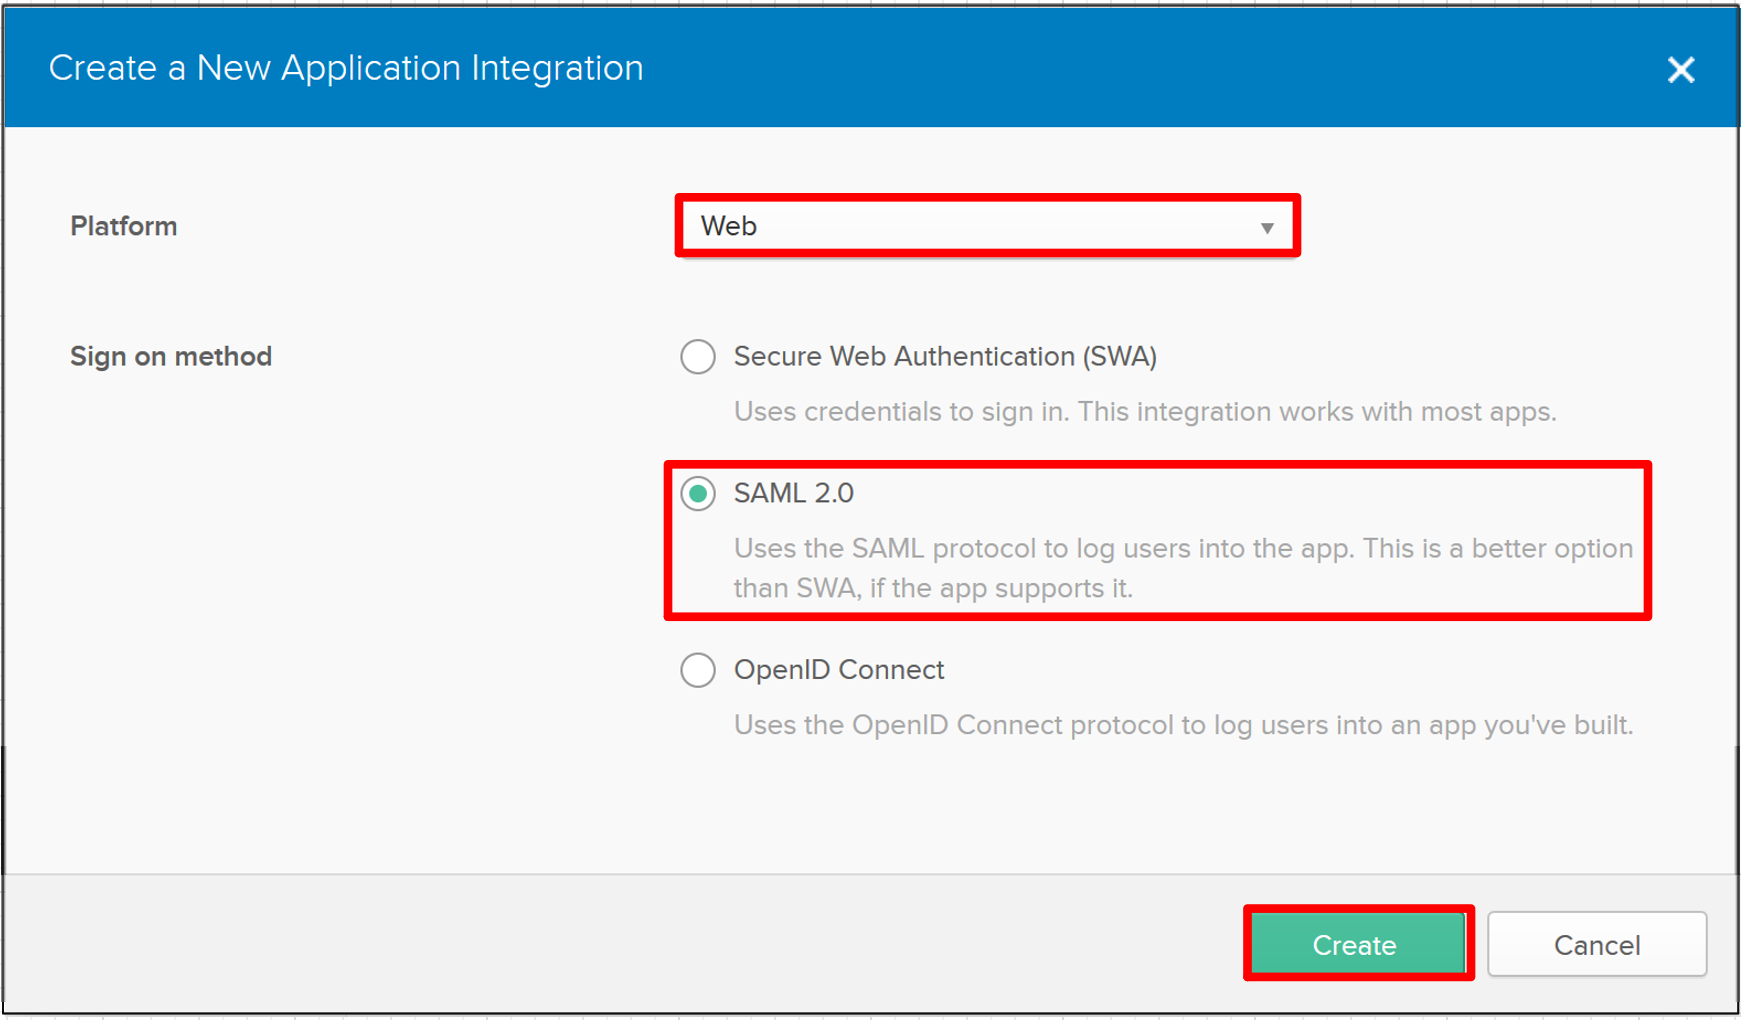
In the Create a New Application Integration dialogue box, select Web from the
drop down for Platform .
Select the SAML 2.0 radio button for Sign on Method and click Create .
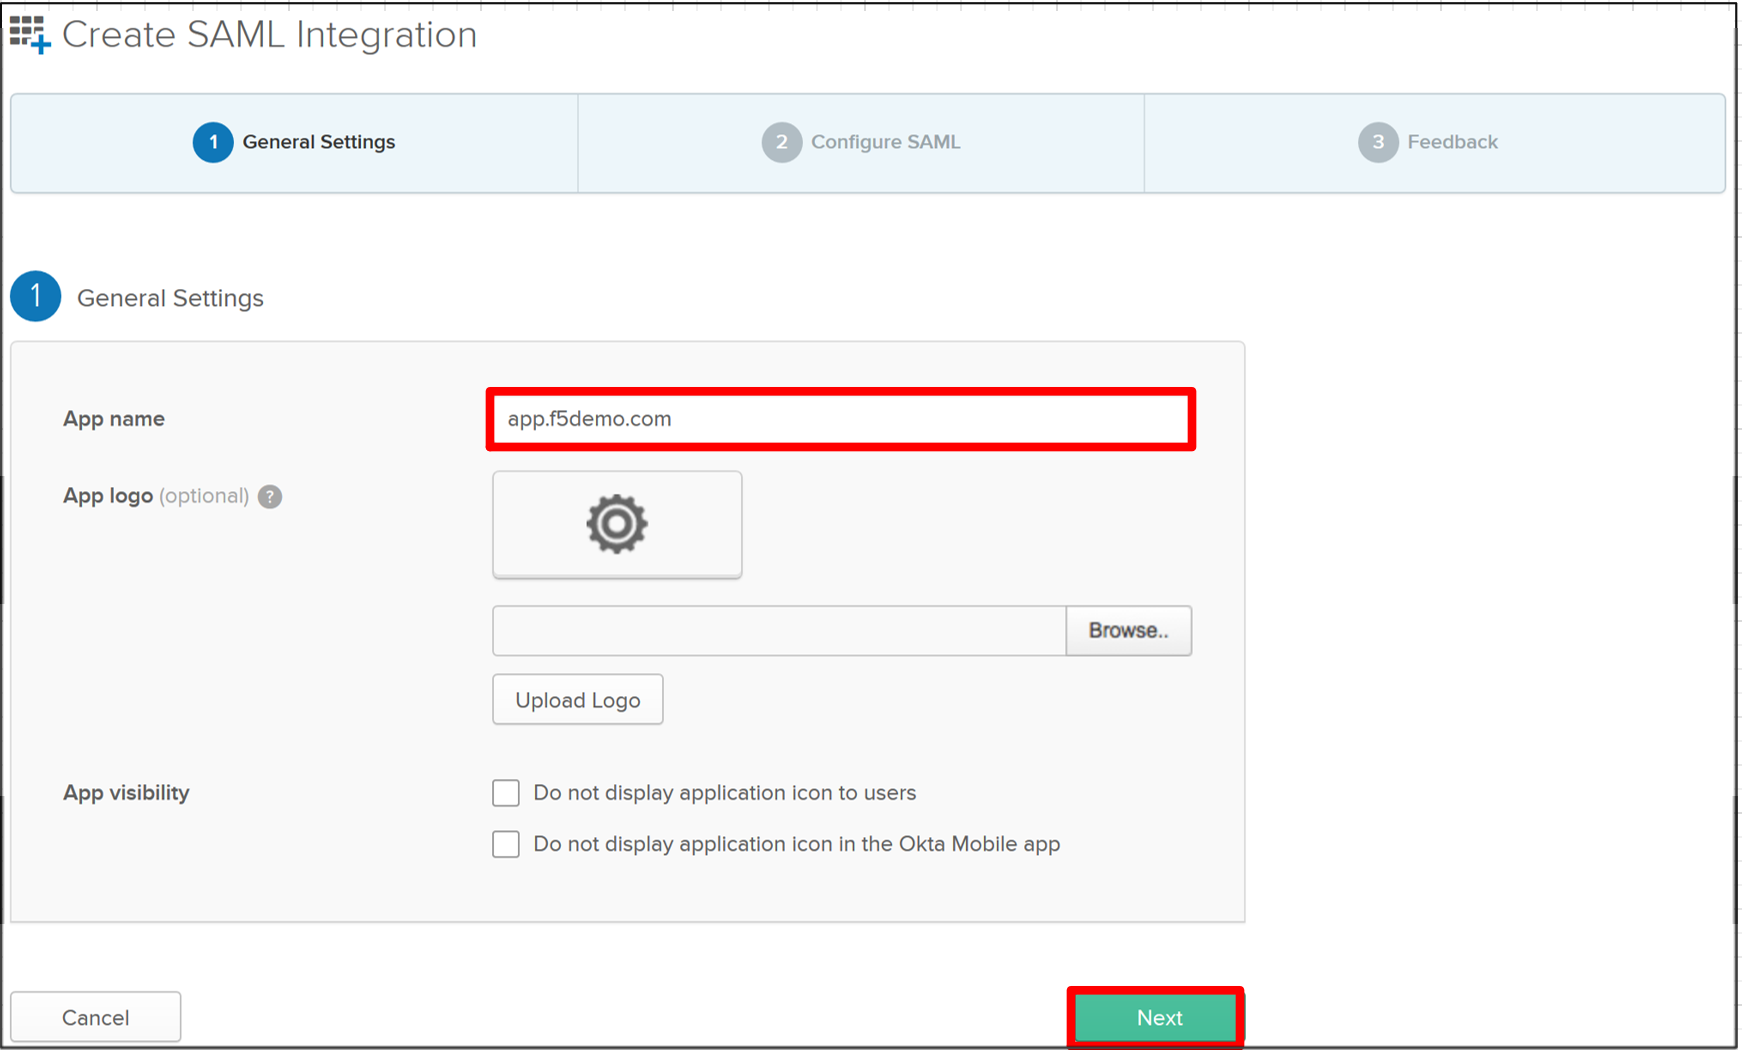
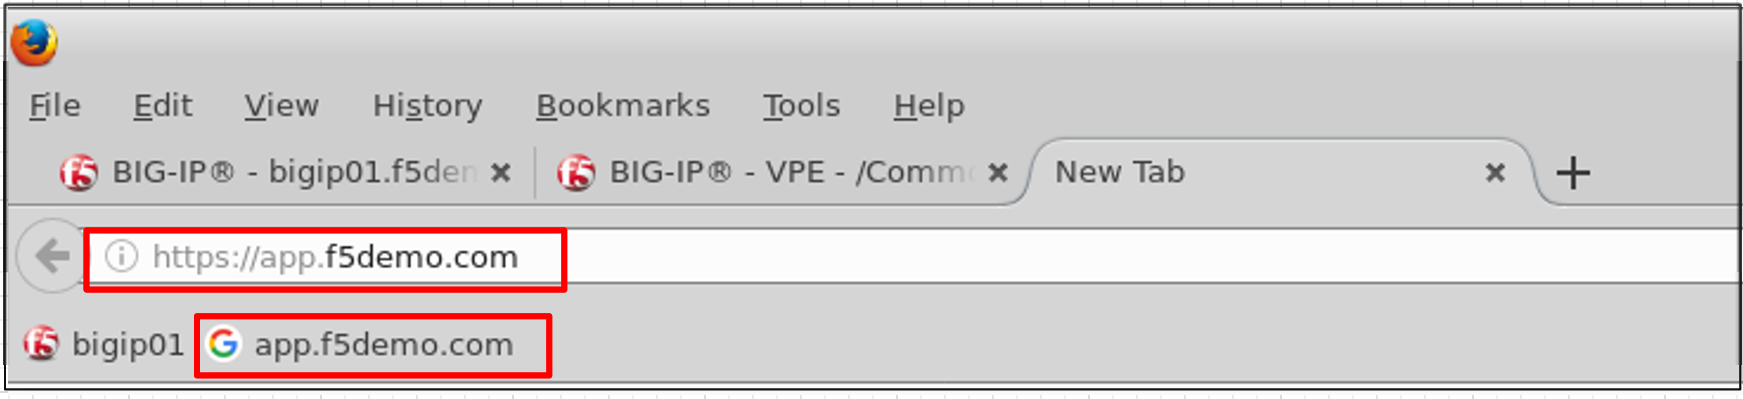
In the Create SAML Integration screen, enter app.f5demo.com for the App Name .
Leave all other values as default and click Next .
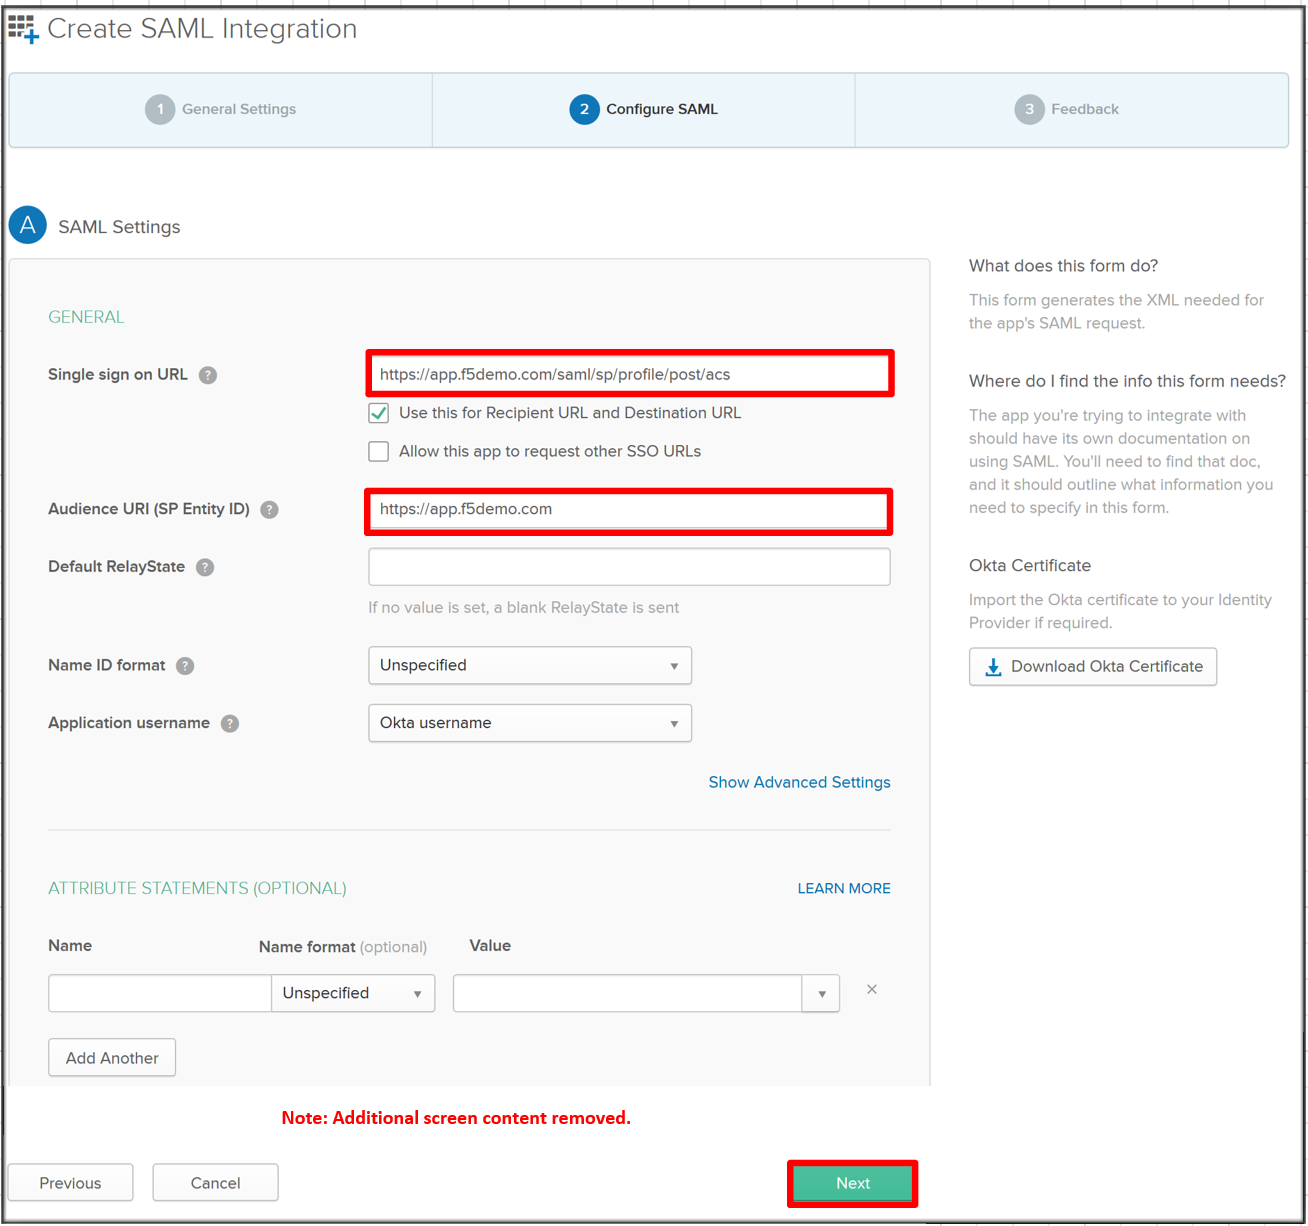
In the Create SAML Integration screen, enter the following values
In the SAML Setting section
Single Sign on URL: https://app.f5demo.com/saml/sp/profile/post/acs Audience URI (SP Entity ID): https://app.f5demo.com
Leave all other values as default and click Next .
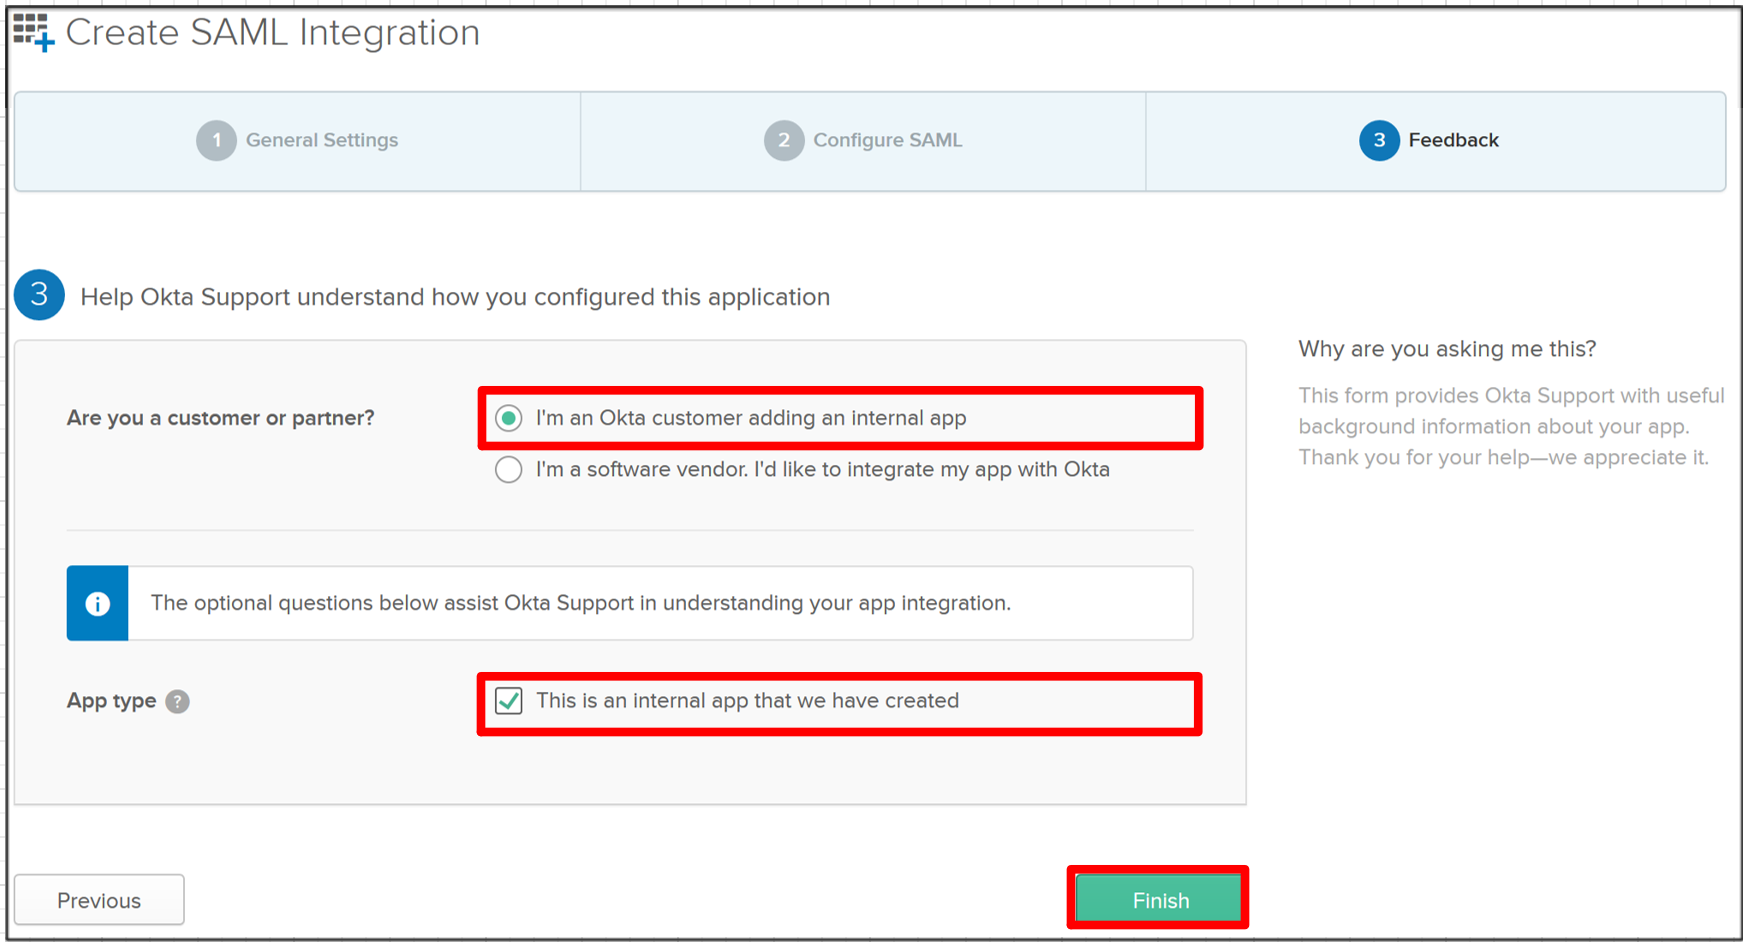
In the Create SAML Integration screen, select the:
“I’m an OKTA customer adding an internal app” radio button for
Are you a customer or partner?
In the resulting expanded window, select:
“This is an internal app that we have created” for App Type
and click Finish .
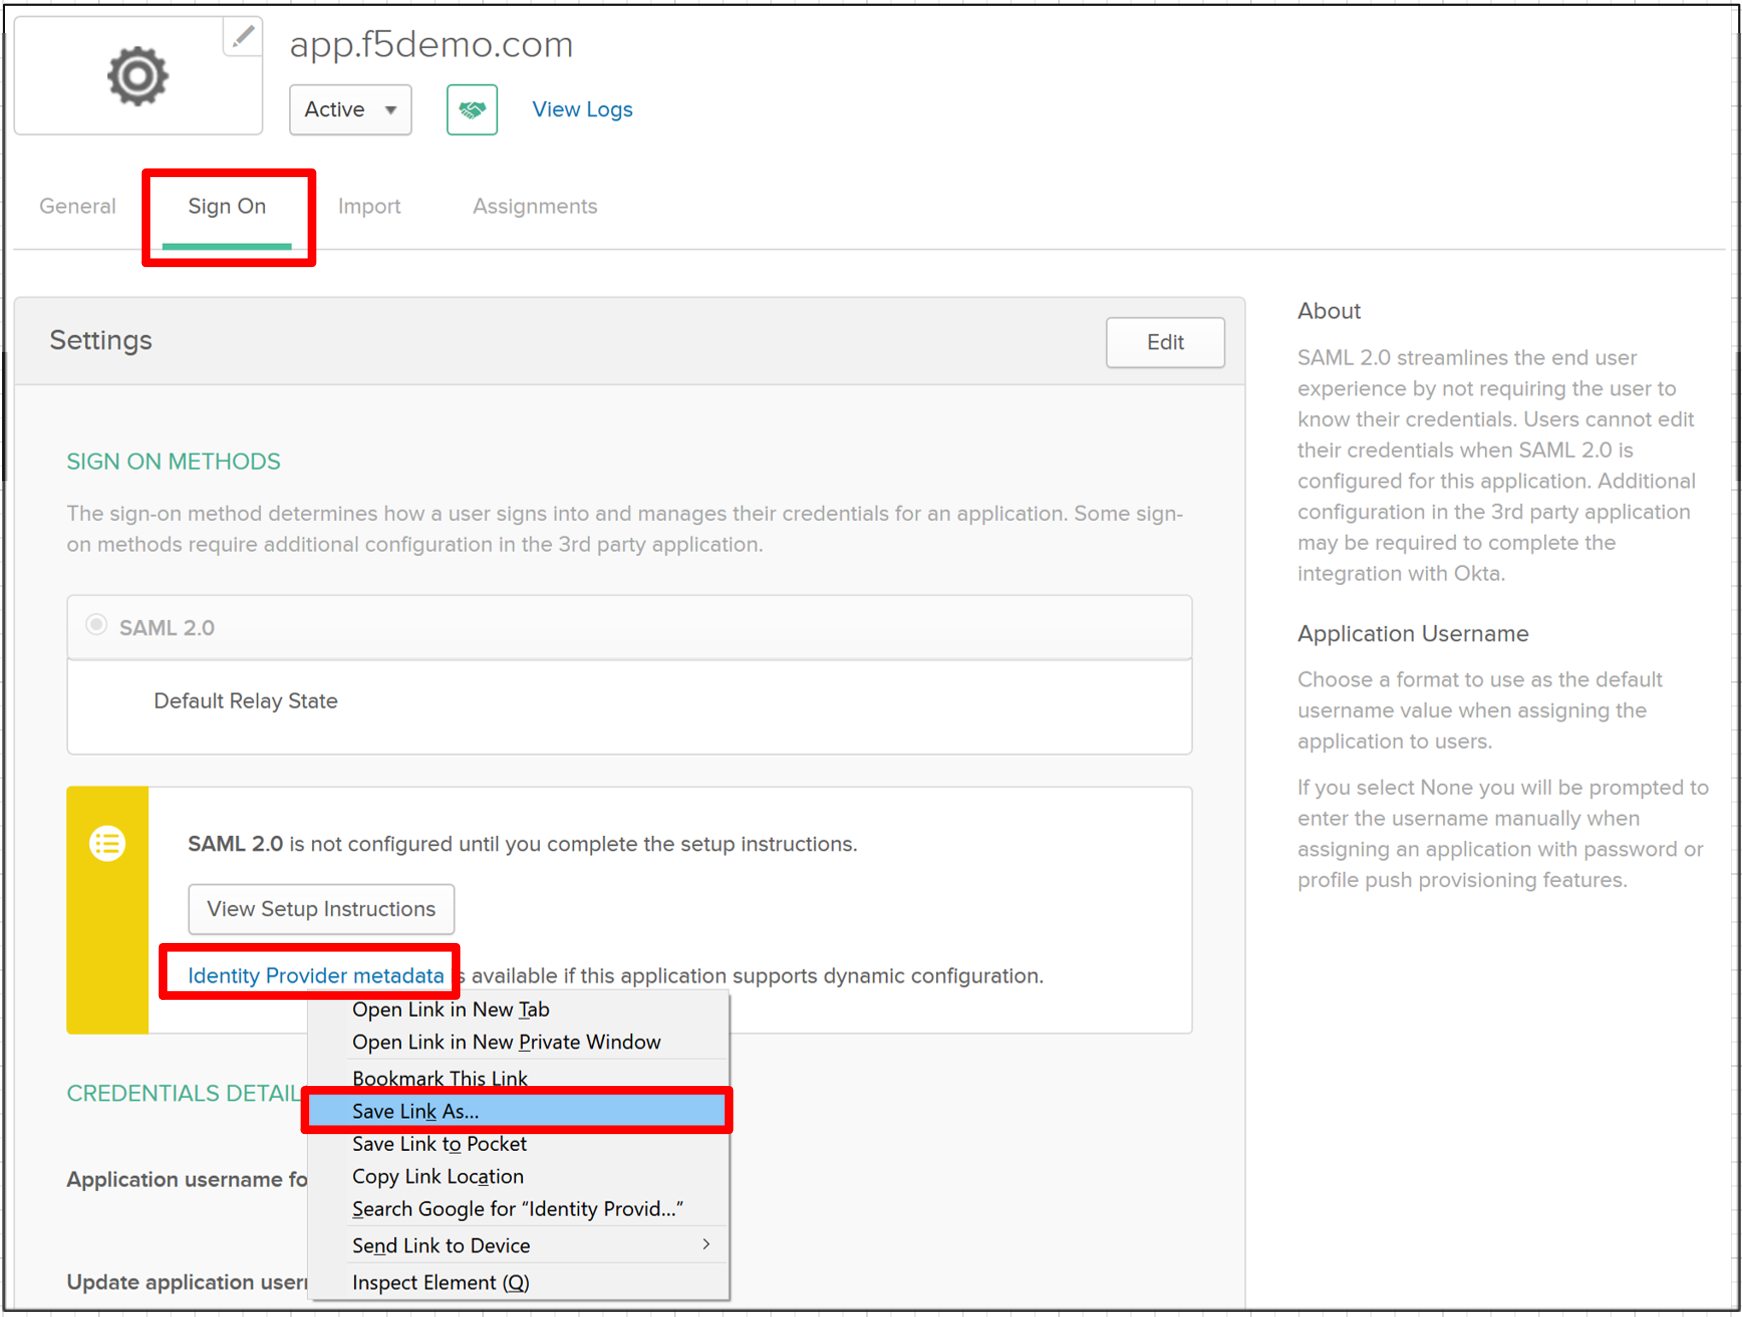
In the resulting application screen for app.f5demo.com , navigate to the
SAML 2.0 section .
Right Click the Identity Provider Metadata hyperlink and click Save Link As …
Save the metadata.xml to your jumphost desktop. We will be using it in a later step
in the Lab.
TASK 5: Add User to SAML Application
Refer to the instructions and screen shots below:
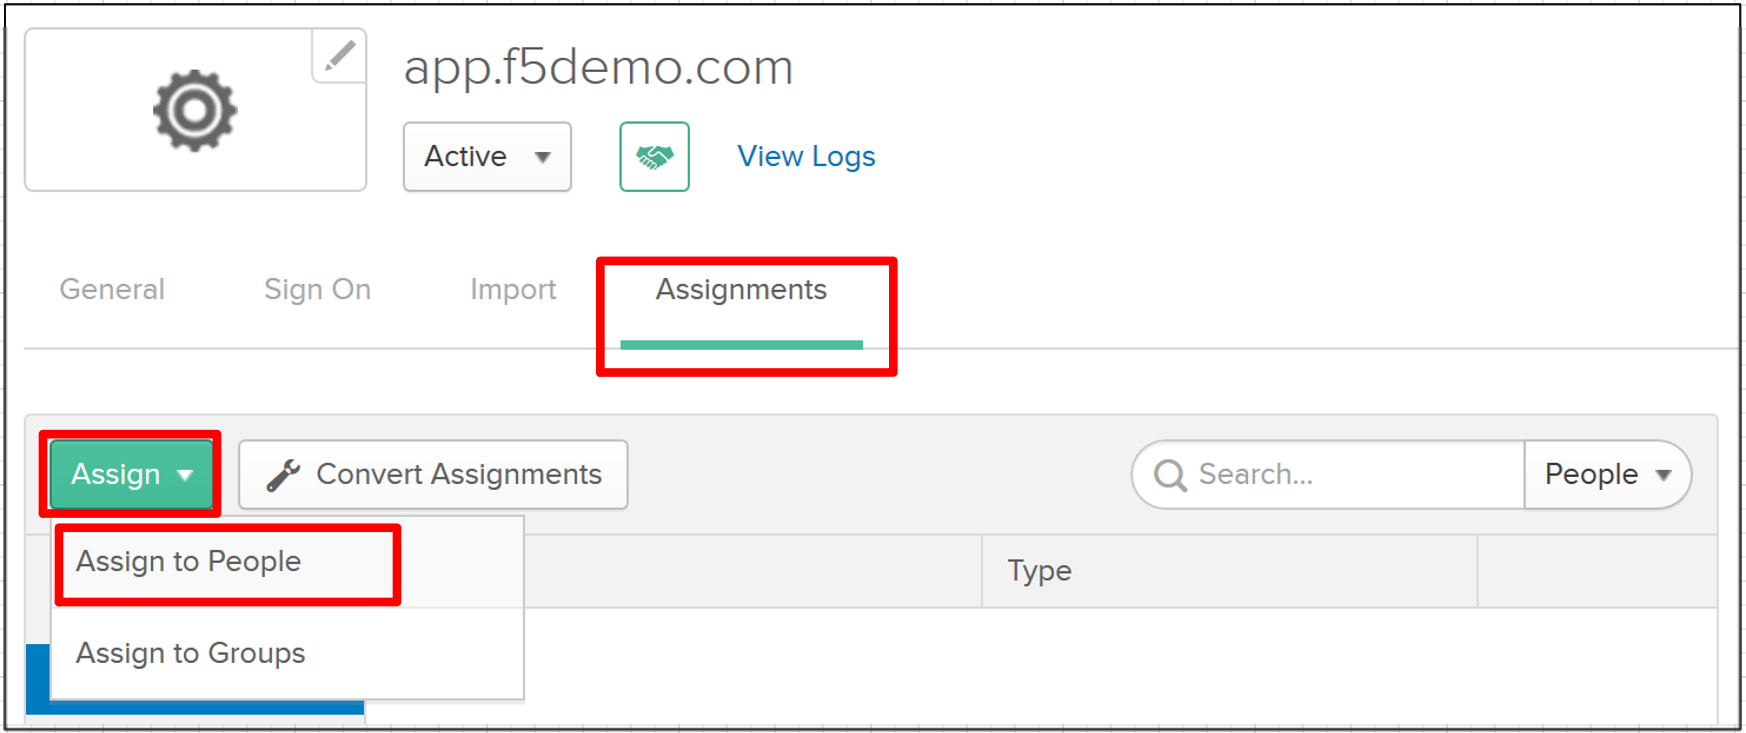
Within the app.f5demo.com application screen, Click Assignments then Assign
and then Assign to People from the dropdown.
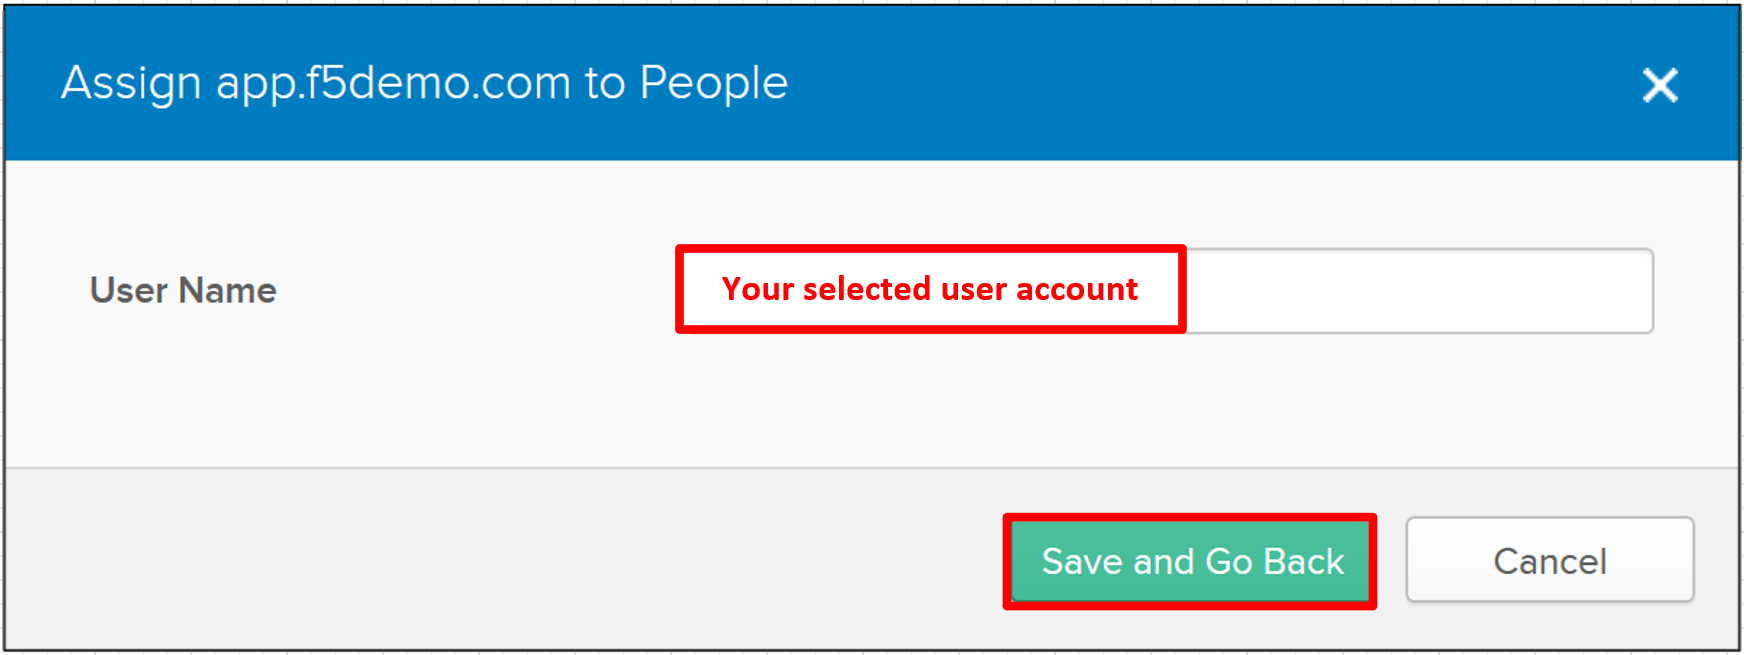
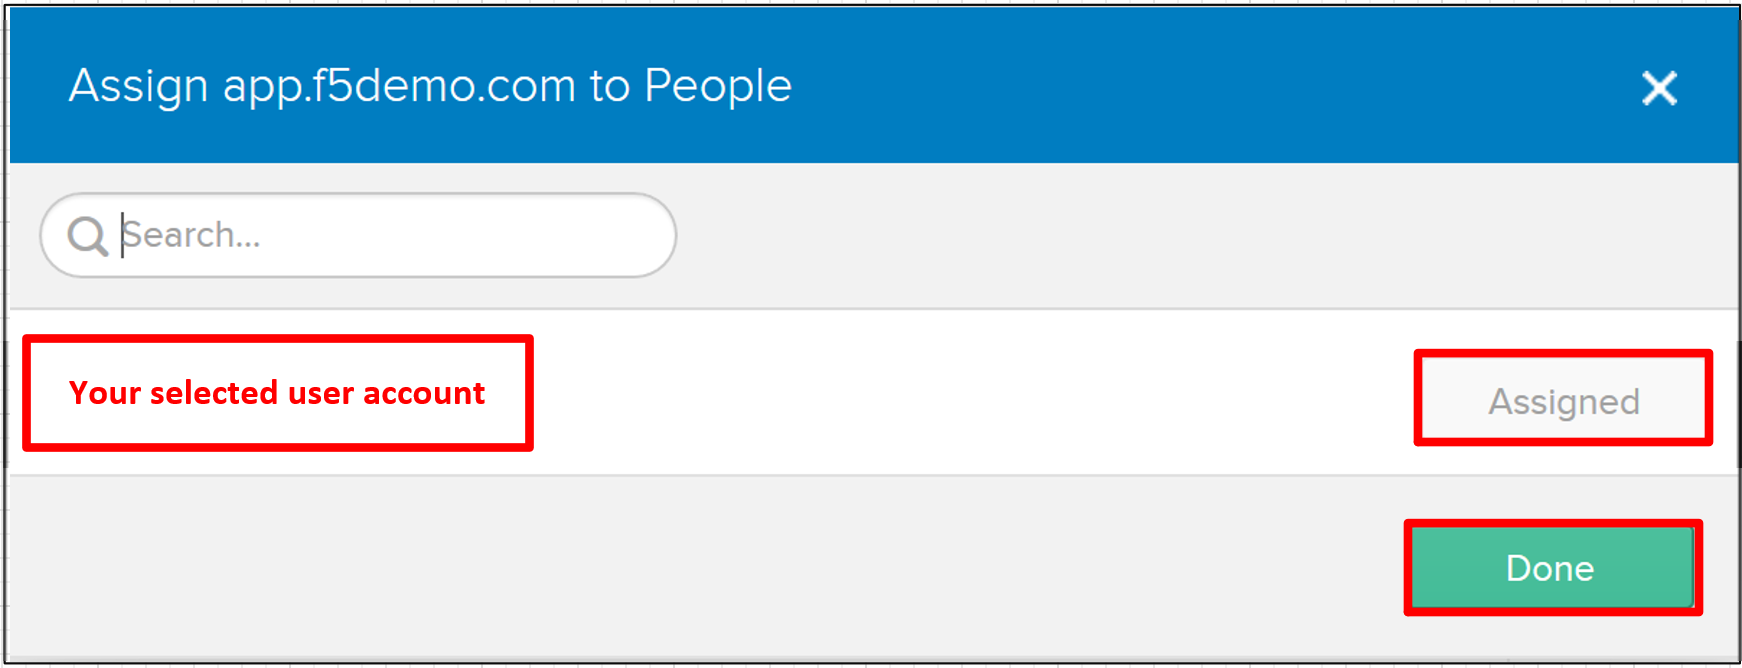
In the Assign app.f5demo.com to People dialogue box, select your User ID , click
Assign , then Done .
Click Save and Go Back .
Click Done .
TASK 6: Add Multi-Factor Authentication Sign-On Policy [OPTIONAL]
Refer to the instructions and screen shots below. This section requires that Task 3 be completed.
[OPTIONAL]
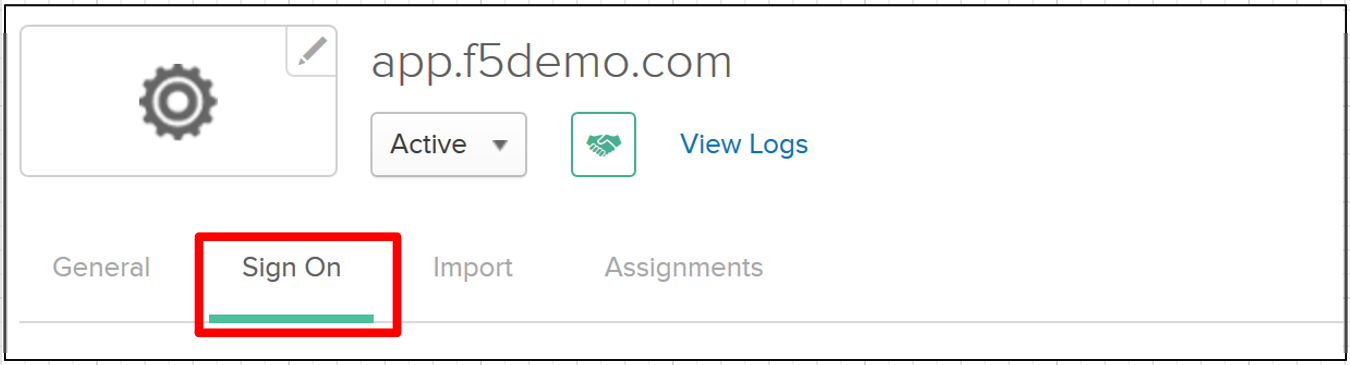
Within the app.f5demo.com application screen, Click Sign On
[OPTIONAL]
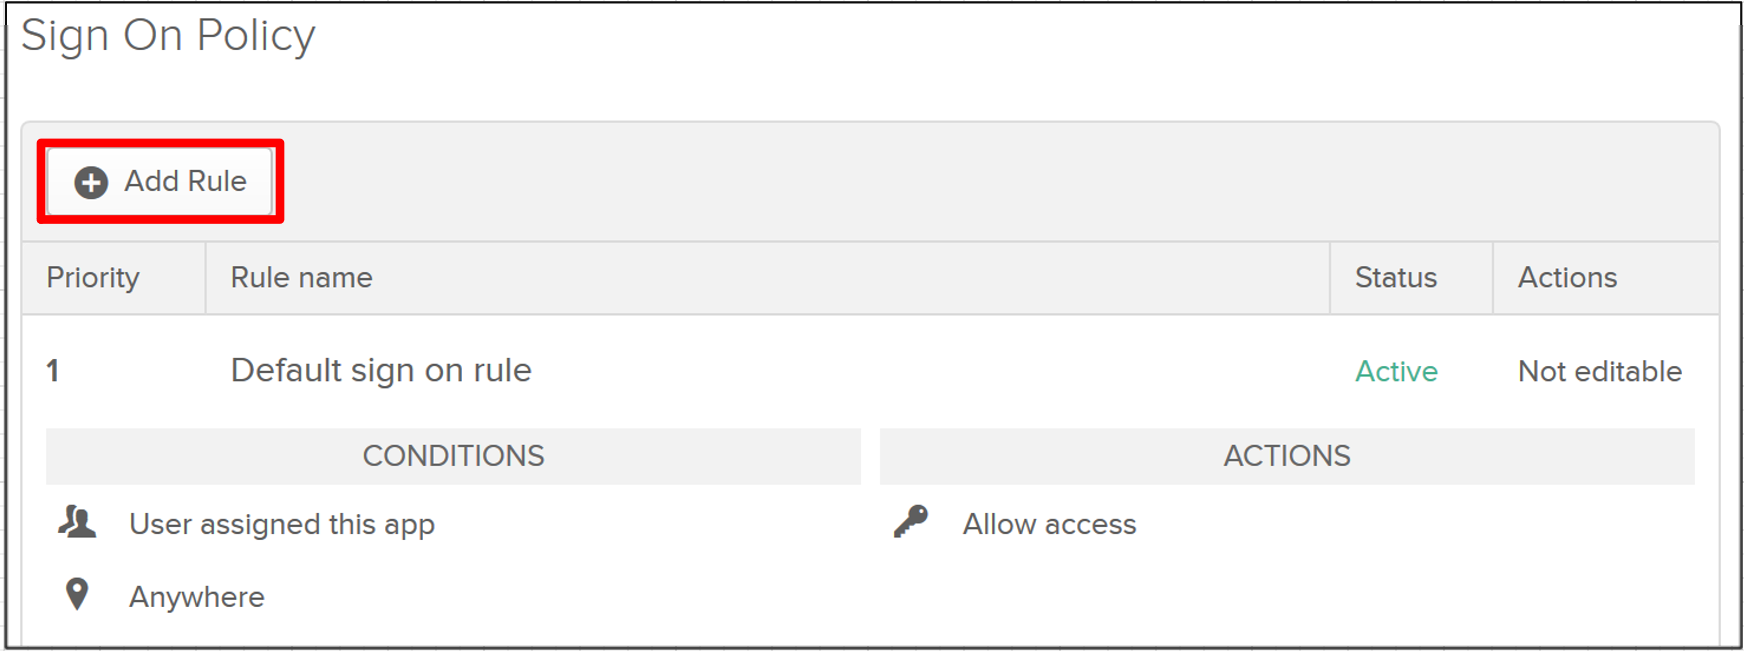
Scroll down to the Sign On Policy section and click Add Rule
[OPTIONAL]
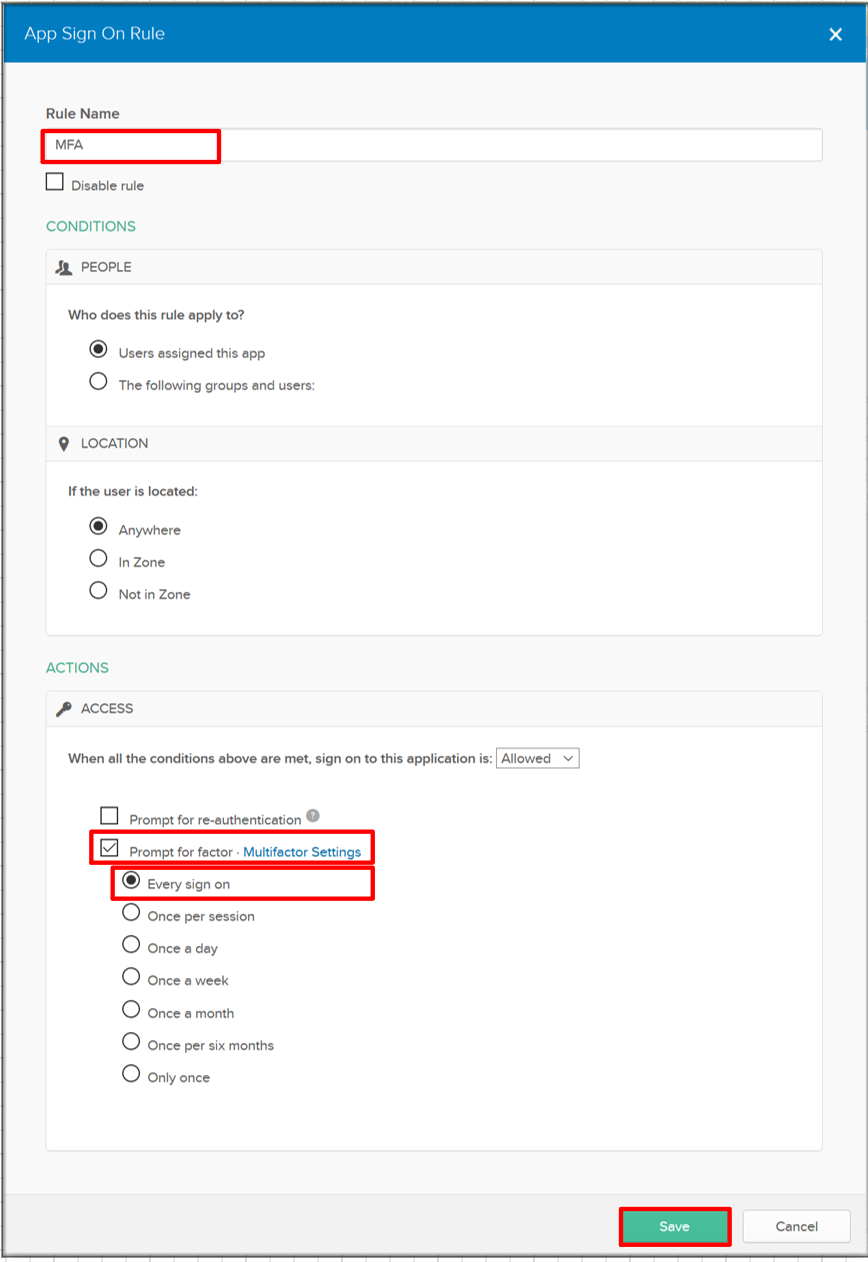
In the Add Sign On Rule dialogue box, enter MFA for the Rule Name .
Scroll down to the Actions section.
In the Actions section, under Access , check the box for Prompt for factor .
Ensure Every Sign On radio button is selected.
Click Save .
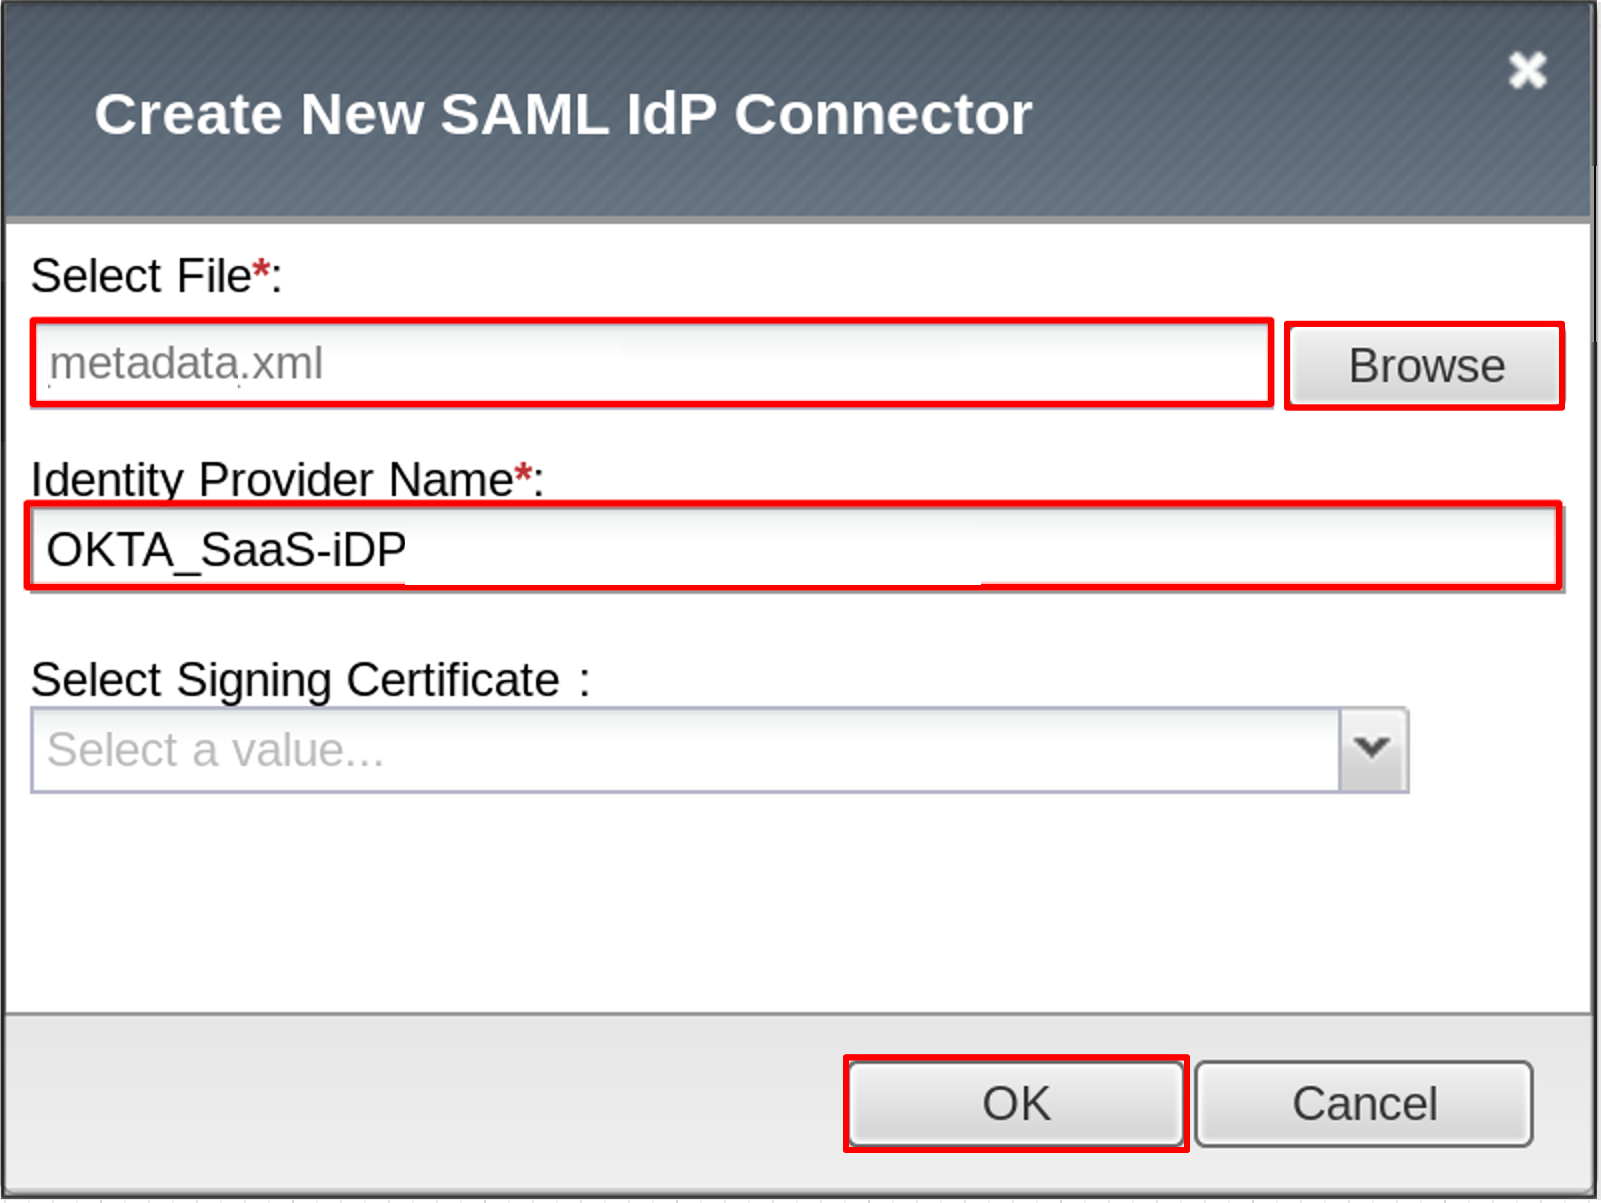
TASK 7: Create the External IDP Connector
Refer to the instructions and screen shots below:
Login to your lab provided Virtual Edition BIG-IP
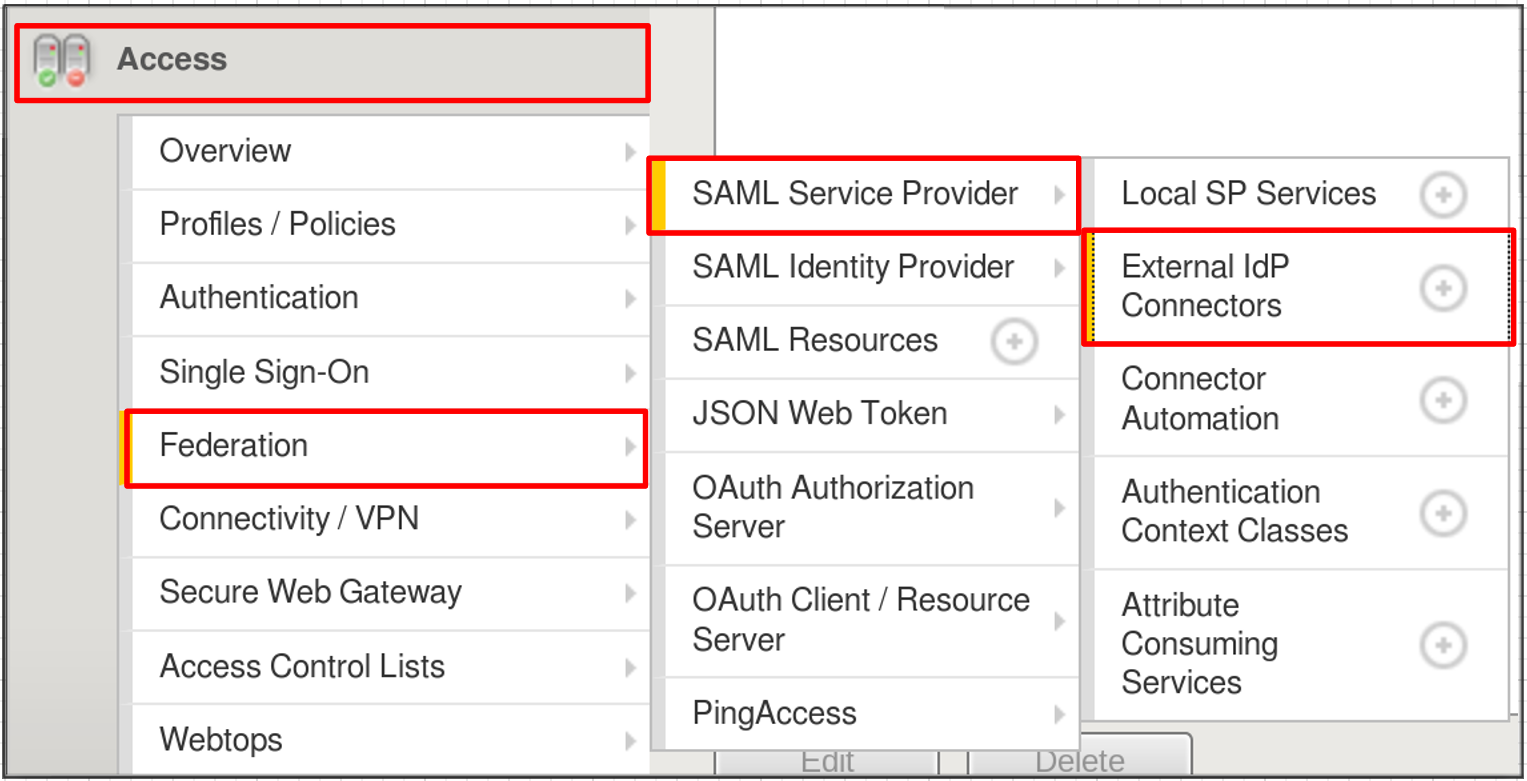
Begin by selecting: Access -> Federation -> SAML Service Provider ->
External IdP Connectors .
In the External IdP Connectors screen, click the downward arrow next to the word
Create on the Create button (right side)
Select From Metadata from the drop down menu
In the Create New SAML IdP Connector dialogue box, use the Browse button to
select the metadata.xml from the desktop (created in Task 4).
Name the Identity Provider Name : OKTA_SaaS-iDP .
Click OK .
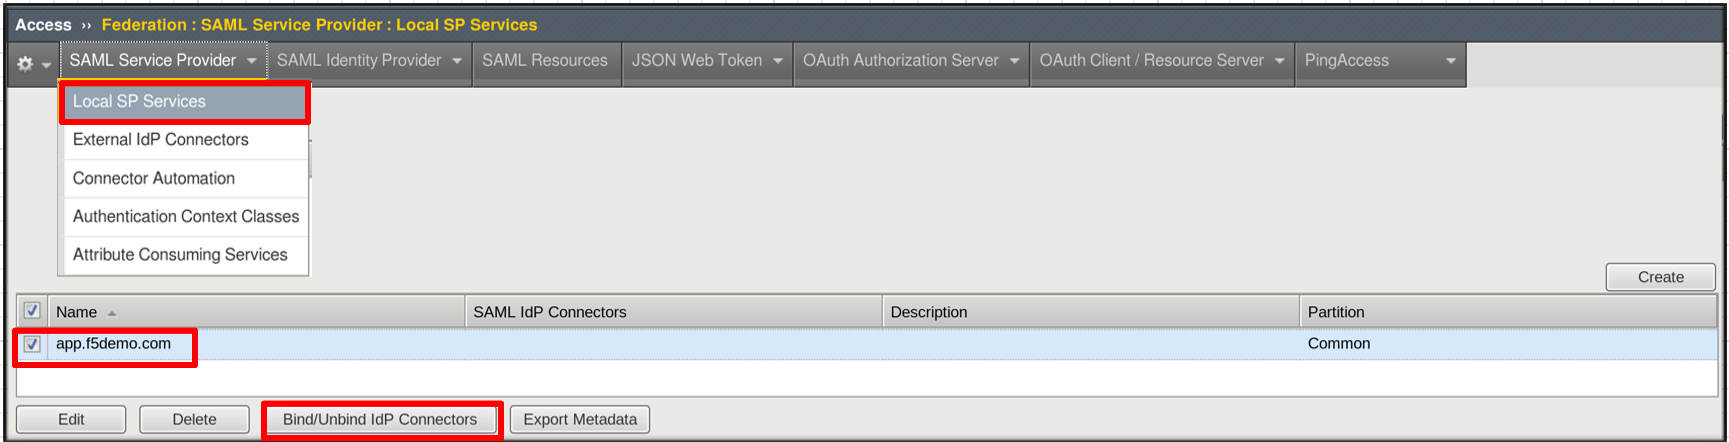
TASK 8: Change the SAML SP Binding
Refer to the instructions and screen shots below:
Begin by selecting: Access -> Federation -> SAML Service Provider ->
Local SP Services
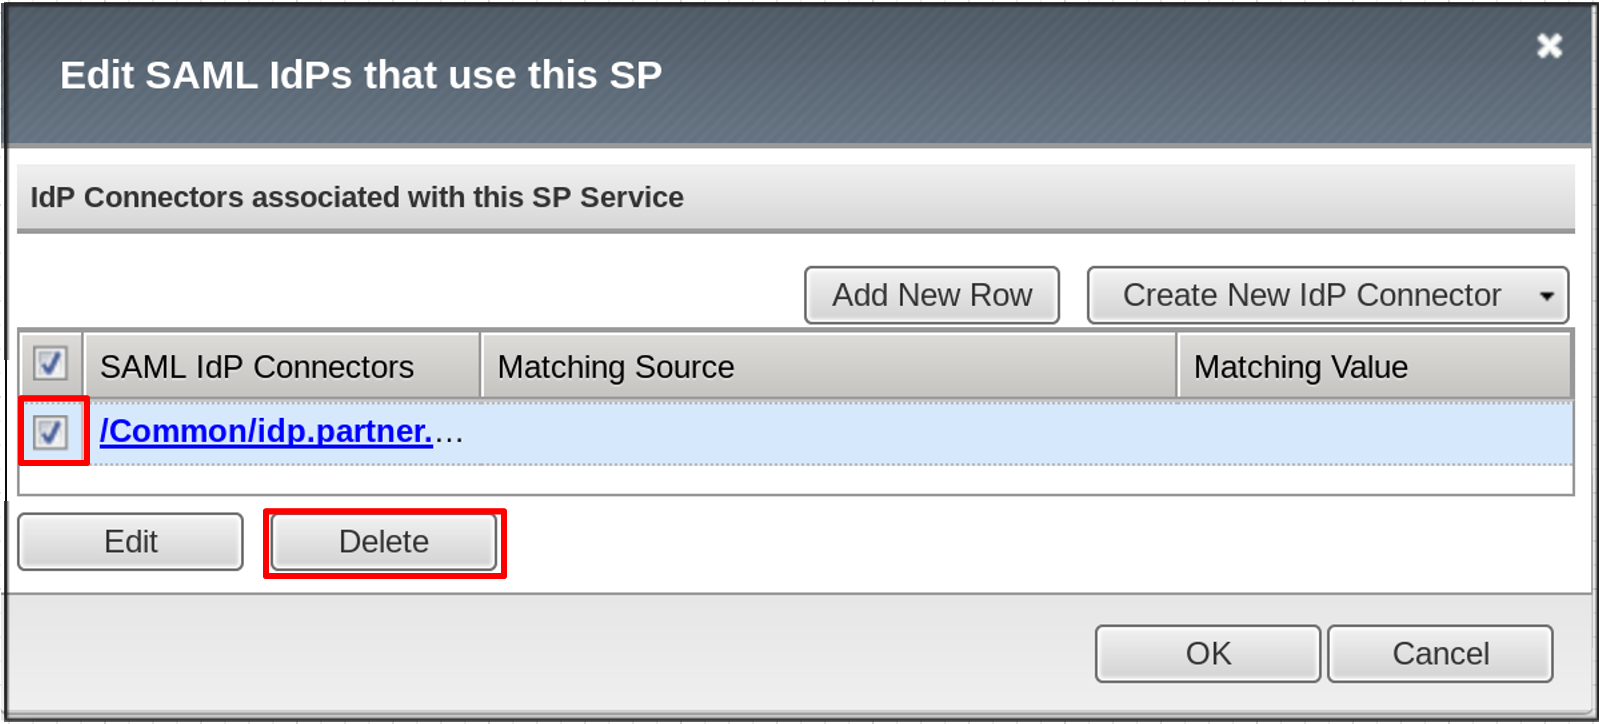
Select the checkbox next to app.f5demo.com and click Bind\UnBind IdP Connectors
Check the existing binding and click Delete .
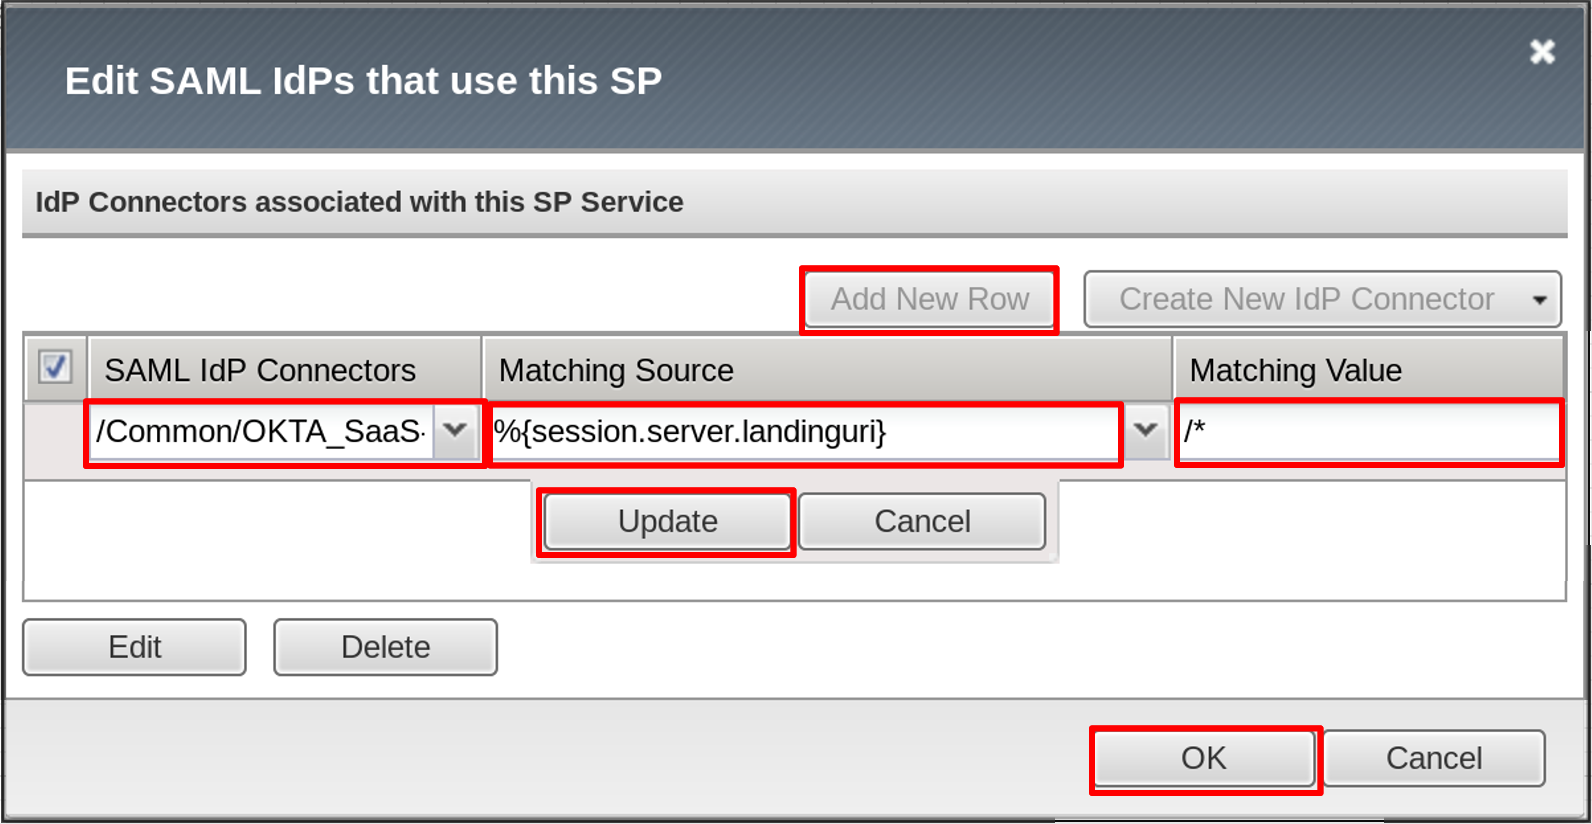
Click Add New Row and use the following values
SAML IdP Connectors: /Common/OKTA_SaaS-iDP Matching Source: %{session.server.landinguri} Matching Value: /*
Click Update then OK .
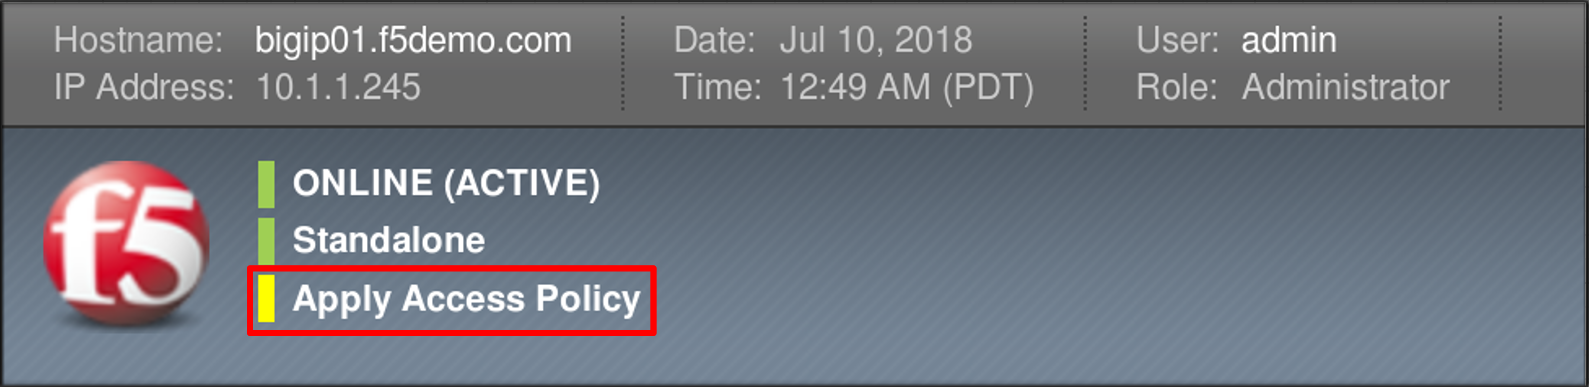
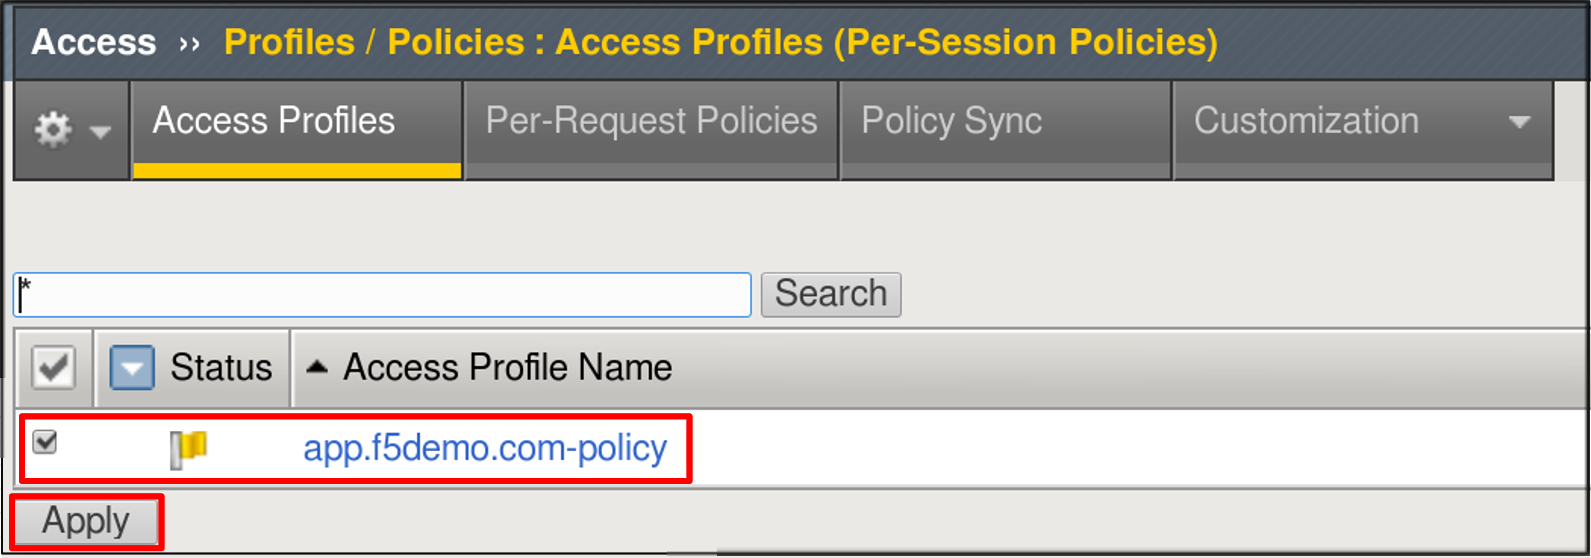
TASK 9: Apply Access Policy Changes
Refer to the instructions and screen shots below:
Click the Apply Access Policy link in the top left corner of the Admin GUI
Ensure app.f5demo.com-policy is checked and click Apply