Lab 6 – BASIC Authentication
In this lab, we will show you how to configure basic authentication leveraging the SSO functionality of APM.
Note
Lab Requirements:
- BIG-IP with APM licensed and activated
- Server running AD and Web services
- Local Host file entries on the Jump Host
Task – Create a Pool
Browse to Local Traffic > Pools and click the ‘+’ next to Pools List to create a new pool.
Name the pool “basic_pool”
Assign the monitor “http” by selecting the monitor and moving it to the left.
Add the following “New Member/Node” to the pool and click Finished:
Node Name: basic, Address: 10.128.20.203, Service Port: 80

Task 2: Create a Virtual Server
Browse to Local Traffic > Virtual Servers and click the ‘+’ next to Virtual Server List to create a new one.
Use the following information to create the virtual server and leave other settings as default, then click Finished:
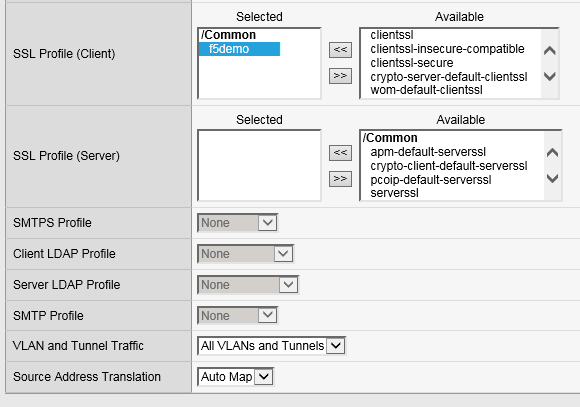
Name the pool “basic_vs”
Destination Address: 10.128.10.13
Service Port: 443
HTTP Profile: http
SSL Profile (Client): f5demo
Source Address Translation: Auto Map
- Default Pool: basic_pool


Task 3: Testing without APM
Observe the current behavior of the login page without APM authentication.
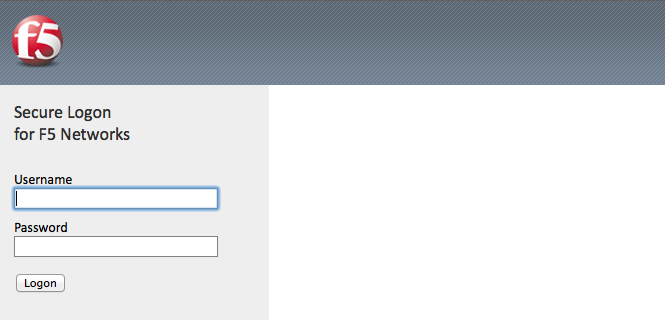
- Open a private browsing window and go to https://basic.f5demo.com. You should receive a prompt that looks similar to the following screen shot:

Enter the following credentials:
- Username: user
- Password: Agility1
Once successfully logged in you will see a webpage similar to this one:

Close the private browsing window.
Task 4: Create Access Policy to use with Basic Authentication
Open the Wizards > Device Wizards page.
Select Web Application Access Management for Local Traffic Virtual Servers
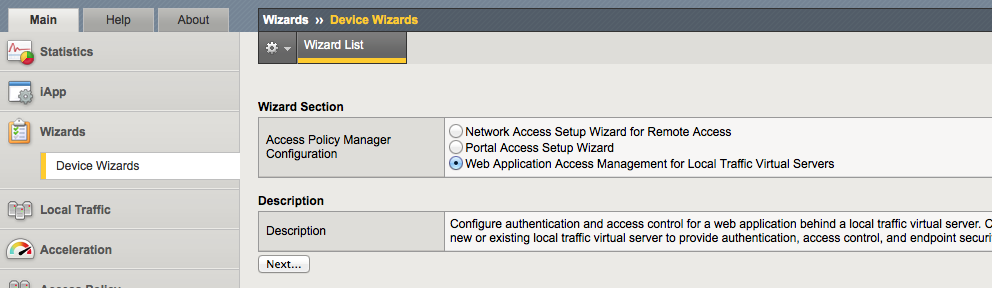
Click Next
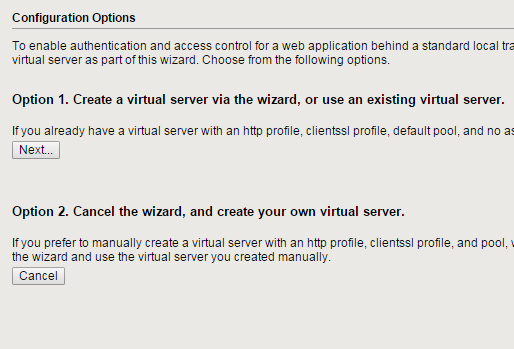
Click Next for Option 1 on the Configuration Options page
Configure Basic Properties for the policy
For Policy Name enter Basic_Access_Policy
Uncheck “Enable Antivirus Check in Access Policy”

Click Next
Configure Authentication type used for policy
Select Use Existing for the “Authentication Options”
Select Lab_SSO_AD_Server::Active Directory
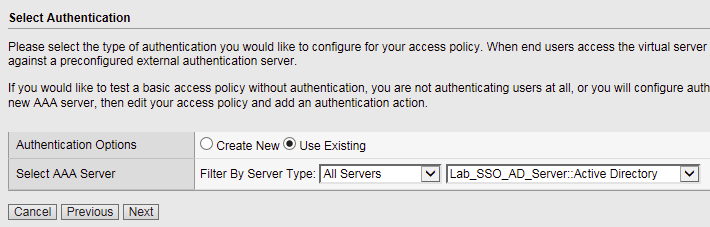
Click Next
Configure SSO
Select Create New for the “SSO Options”
Choose HTTP Basic
Click Next

Configure Virtual Server
Select Use Existing HTTPS Server
Choose /Common/basic_vs for the Virtual Server**

Click Next
Review configuration and click Next
Review the “Setup Summary”, which shows all (existing and new) objects associated with this new policy.
Click Finished
Add a logout URI Include to the new access policy
Open the Access > Profiles / Policies > Access Profiles (Per-Session Policies) page
Click on the name of the new policy Basic_Access_Policy
Add “/Home/Logout” to “Logout URI Include”
Change Logout URI Timeout to 1 second

Click Update
Enable the SSO Configuration
Click on the SSO / Auth Domains tab
For SSO Configuration, select Basic_Access_Policy_sso

Click Update
Task 5: Applying Access Policy
After you create or change an access policy, the link Apply Access Policy appears in yellow at the top left of the BIG-IP Configuration utility screen. You must click this link to activate the access policy for use in your configuration.
Click the Apply Access Policy link, which will bring you to the Apply Access Policy screen, with a list of access policies that have been changed.
Select the Access Policy and click the Apply button (by default, all access policies that are new or changed are selected).

After you apply the access policy, the Access Profiles list screen is displayed.
Task 6: Testing with APM Authentication
Observe the behavior of the login page with authentication enforced by APM.
Open a private browsing window and go to https://basic.f5demo.com. You should see a page that looks like the following:
Logon with the following credentials:
Username: user
Password: Agility1
Once successfully logged in you will see the same web page observed in task 3:
Task 7: Testing Logout
Earlier in Task 3, Step 9, we defined a Logout URI Include for this Access Policy. This is a list of logoff URIs that the access profile searches for in order to terminate the Access Policy Manager session. The URI we used was /Home/Logout, and the default logout delay is 5 seconds which was modified to 1 second.
- Click the Logout link located at the top right of the web pagee
- Wait 1 second
- Click the “App #1” link in the banner at the top of the page
- You should be redirected back to the F5 logon page